HR Hub Settings Overview
Before you are able to process payroll, all employees and settings must be configured. We recommend finalizing all Settings before adding Employees. This makes it easier to update each Employee with the correct Deductions, Pay Types, and Leave Types.
To manage your HR Hub Settings, go to HR > Settings.
Note: If you are migrating from SimpleCity Payroll to HR Hub, gWorks can import the majority of your Payroll data to simplify setup. Even though many of the Settings below will be imported from Payroll, there are some items that do not translate from one system to another and will require manual setup. Read Migrating Data from SimpleCity Payroll into HR Hub for specific instructions regarding the migration and items that require special attention. However, we always recommend going through each of these items and checking for accuracy.
Deductions & Benefits
Set up Deductions that will then be associated with employees. To view and manage Deductions, go to HR > Settings > Deductions/Benefits.
To update an existing Deduction, select the Deduction from the list and edit as needed.
To add a new Deduction, click Add Deduction.
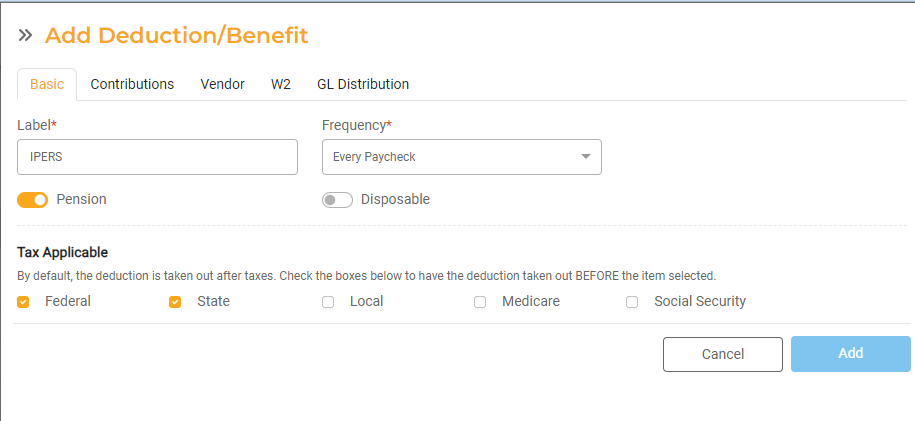
- Basic: Add a Label and Frequency for the Deduction. Indicate whether the Deduction is associated with a Pension or if it should be taken out before calculating Disposable Income. Mark whether the Deduction reduces Federal, State, Social Security, Medicare, or Local taxable income.
- Contributions: Add the Employee Contributions and Agency Benefit Contributions by setting the method, amount or percentage, and any maximums.
- Vendor: Select the Vendor that will be paid.
- W2: Indicate whether the Deduction or Benefit should be printed in Box 10, Box 12, or Box 14 (Other) of the employee's W2.
- GL Distribution: Choose which General Ledger Accounts each Deduction should be applied to.

For more detailed information on Deductions, read How Deductions Work.
Pay Types
Set up all Pay Types that need to be paid throughout the year. Pay Types determine Pay Frequency, Taxation, and more. Each hourly, salary, allowance, or per item should be added as a Pay Type. To view and manage Pay Types, go to HR > Settings > Pay Types.
To update an existing Pay Type, select the Pay Type from the list and edit as needed.
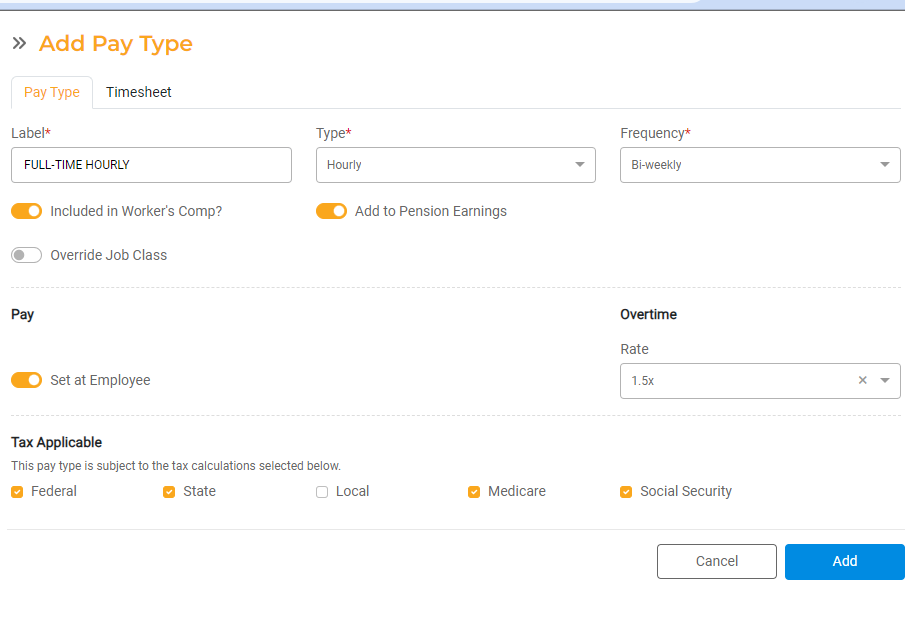
To add a new Pay Type, click Add Pay Type. Add a Label, Type, and Frequency. Indicate whether pay for that Pay Type should be included in Worker's Comp or added to Pension Earnings. Input the Pay Rate or indicate that the Pay Rate will be set at the employee level. If employees earn Overtime for this Pay Type, select the overtime rate. Lastly, use the checkboxes to indicate applicable taxing authorities for the Pay Type.
For more detailed information about Pay Types, please read How Pay Types Work.
Leave Types
Use Leave Types to add in all types of leave you offer including Vacation, Sick/PTO, Holidays, unpaid leave, and more. To view and manage Leave Types, go to HR > Settings > Leave Types.
To update an existing Leave Type, select the Leave Type from the list and edit as needed.
To add a new Leave Type, select Add Leave Type. Add a Label and select the Type. Use the flags to determine whether hours used for that Leave type will count toward overtime, Leave hours are considered sick, FMLA, or the Leave Type will be used for Comp Time. Enter the Earn Method (how Leave will be earned), how many hours are Earned Per Period. Select how Leave gets carried over from one year to the next and Maximum Time.
For more detailed information on Leave Types, including Levels, read How Leave Types Work.
Vendors
Set up Vendors that need to be paid throughout the year. To view and manage Vendors, go to HR > Settings > Vendors. Vendors are selected when setting up Deductions & Benefits so they must be set up first.
To update an existing Vendor, select the Vendor from the list and edit as needed.
To add a new vendor, click Add Vendor.
- Vendor ID: Search for a Vendor by entering the Vendor Name or Number in the Vendor ID field This list is populated by Vendors in Finance Hub. All Vendors must first be created in Finance Hub before they can be selected here.
- Label: The Label will populate automatically based on the Vendor ID selected.
- Payment Frequency: Select how often the Vendor will be paid. All vendor payments will need to be made through Accounts Payable. However, Based on the Payment Frequency, HR Hub will generate reports and, upon data import into Accounts Payable, will create invoices for Vendor Payments.
- If the Vendor is the entity used to pay Federal Tax or State Tax, select the appropriate checkbox.

Cost Centers
You will need to configure all Cost Centers from which employees need to be paid. To view and manage Cost Centers, go to HR > Settings > Cost Centers.
To update an existing Cost Center, select the Cost Center from the list and edit as needed.
To add a new Cost Center, select Add Cost Center.
- Label: Add a unique Label to describe the Cost Center.
- Code: Enter the Cost Center Code.
- Benefit Fund: Toggle this on if the Cost Center uses a Benefit Fund.
- Defaults: Enter Fund Code, Department Code, and Gross Line Code.
- Worker's Comp: Select the Worker's Comp Code from the dropdown list. Worker's Comp codes are set up in City Settings.

City Settings
Before you can process a Payroll, you will need to set up your General City information and Pay Periods in HR Hub. To do this, go to HR > Settings > City Settings.
- General Tab
- Enter your Employer Federal ID Number
- Enter your Employer State ID Number (this is usually the same as the Federal ID)
- Select the frequency for paying Federal Taxes. The frequency selected here will be used to automatically generate the associated reports.
- State Unemployment Insurance: Enter your ID Number, Rate, Contact Person, and Contact Phone Number for Unemployment Insurance.
- Select the template you will use to print your W2's.
- If your employees can bank overtime to Comp Time, toggle this on. Select the Time Rounding option you use for TimeTracker. Timesheet is for HR Hub Standard.
- Worker's Comp Tab: Enter the Worker's Comp codes used by your agency. Use the + icon to add multiple Codes. These codes will be available to associate with Cost Centers.
- Pay Periods Tab: Determine when Pay Types of each Frequency should populate into Payroll. For example, set which months and dates any Pay Type with Quarterly frequency should get paid. Based on these settings, employees will get added to Payroll runs automatically based on the frequency of their Pay Type. Configure the dates for each Frequency you utilize.
- Frequency: Choose Weekly, Bi-weekly, Semi-monthly, Monthly, Quarterly, Semi-annual, or Annually.
- Effective Date: Choose the start date for this Pay Frequency. Based on the Effective Day, HR Hub will start populating Payroll Runs
- Period End Day: Choose the day or date the selected period will end, (this is the Paid Through Date).
- Payment Day: Choose the day or date that will be the Pay Date for the period. Keep in mind Direct Deposit timelines.
Examples:
- Weekly Pay: In addition to the Effective Date, enter the Period End Day and the Payment Day. For example, your week may end on Saturday and employees get paid the following Wednesday. Enter Saturday as the Period End Day and Wednesday as the Payment Day.
- Bi-weekly Pay: For those that pay Bi-weekly, or every other week, enter Period End Day and the Payment Day. For example, your bi-weekly period may end Wednesday with payday on Friday. Enter Wednesday as the Period End Day and Friday as the Payment Day.
- Semi-Monthly Pay: For those who get paid Semimonthly, or twice a month, enter the 1st Period End Date and the 1st Period Payment Date for the first payment in the month. Then do the same for the second payment in the month. For example, your first Pay Period might be the 1st through the 15th with a Payment Day of the 20th. Your second Pay Period might be the 16th through the last day of the month with a Payment Day of the 5th of the next month.
- Monthly Pay: For those who get paid Monthly, enter the Period End Date and the Payment Date for the monthly Pay Period. For example, your Pay Period may line up with the calendar month and start on the first and end the last day of the month with a Payment Date on the last day of the month as well.
- Quarterly Pay: For those who get paid Quarterly, enter the 1st Period End Month, the 1st Period End Date, and the 1st Period Payment Date for the first Quarterly Pay Period. All other Pay Periods will be calculated every three months based on this information. For example, your Pay Periods may be January - March, April - June, July - September, and October - December with Payment Dates on the 5th of the month immediately following the end of the quarter. Enter March as the 1st Period End Month, Calendar End of Month as the 1st Period End Date, and 5 as the 1st Period Payment Date.
- Semi-annual Pay: For those who get paid Semi-annually, enter the 1st Period End Month, the 1st Period End Date, and the1st Period Payment Date for the first Semi-annual Pay Period. All other Pay Periods will be calculated every six months based on this information. For example, your Pay Periods may be January - June and July - December with Payment Dates on the first day of the next period. Enter June as the 1st Period End Month, Calendar End of Month as the 1st Period End Date, and 1 as the 1st Period Payment Date.
- Annually: For those who get paid Annually, enter the Period End Month, Period End Date, and the Payment Date for the annual period. For example, your Annual Pay Period might be December 5th 2021 through December 4th 2022 with a Payment Date of December 15th.

- Check Template Tab. For more details about how to configure and use Check Templates, see How to Configure Paper Checks.
- ACH Setup Tab. Refer to How to Set Up & Use Direct Deposit for detail on setting up your ACH Bank Details.
Now that you have everything set up, you are ready to process Payroll! See How to Process Payroll for more information!

