How to process an Accounts Payable Run and Pay Vendors
 Updated
by
Janelle Heuton
Updated
by
Janelle Heuton
In Accounts Payable > Accounts Payable Run it is a simple three or four-step process to pay vendors depending on the features you use. Additional detail on each of these steps is provided below.
- Enter Invoices
- Add Invoices
- Schedule invoices
- Once invoices are verified, Print the Claims Report for Scheduled invoices
- Print the Claims Report for both Paid and Scheduled invoices for your council meeting
- Print Vouchers (if applicable)
- Print Checks
- Finalize the Accounts Payable run
1. Enter Invoices
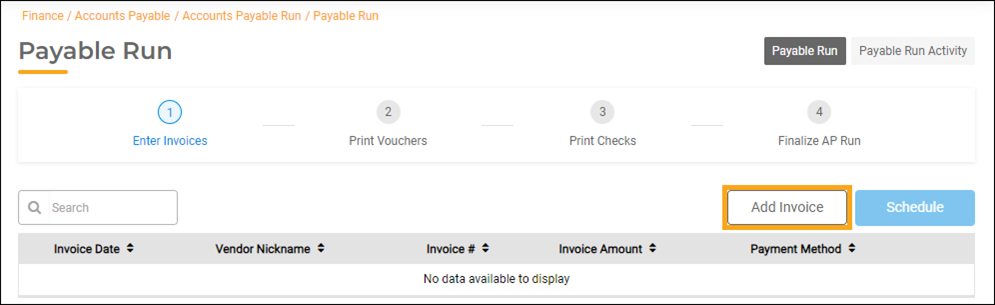
The Payable Run screen defaults to Enter Invoices. Click the Add Invoice button to create a new invoice.
Add Invoices
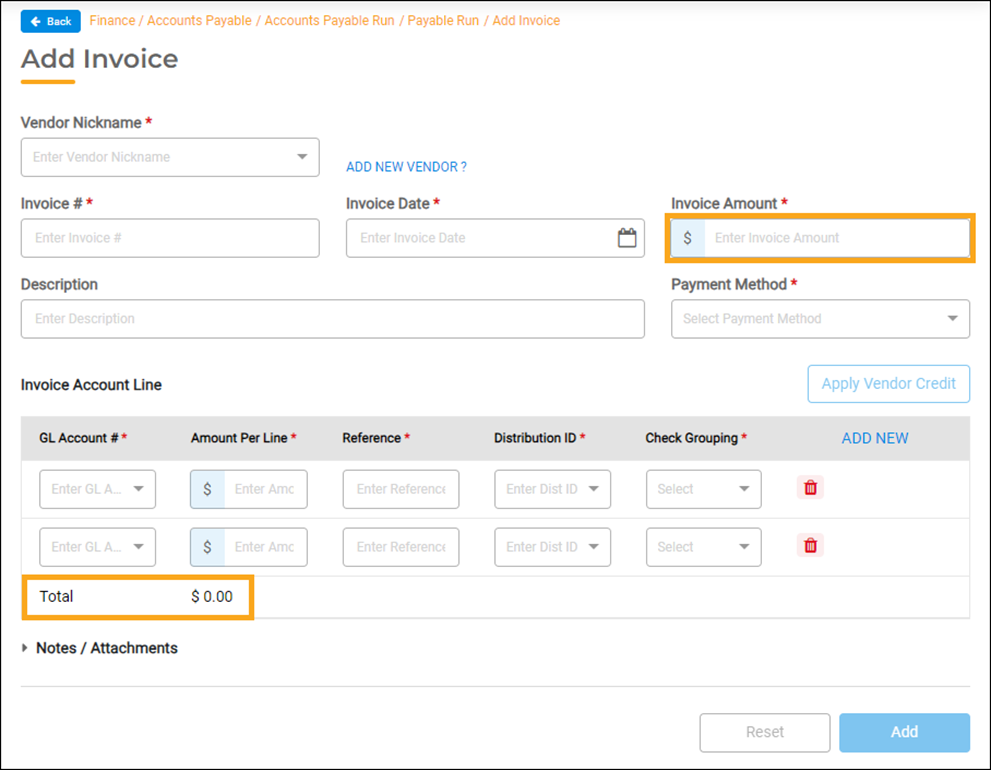
- In the Search field on the Add Invoice screen, begin typing the nickname assigned to the vendor whom you need to pay. The list of vendors will change to fit the criteria you enter alphabetically as you type. Select the vendor from the drop-down list.
- Enter the Invoice #, select the Invoice Date, and enter the Invoice Amount. You will not be able to enter an invoice number that has previously been paid.
- The Description you enter will be included in the Claims Report for your council meeting. The description can be a summary of the purchases, such as Office Supplies, or you can include more details about the items that were purchased (what is important to your council?). You can enter a description of up to 100 characters.
- The Payment Method will default from the settings in Vendor Management, but you can change it here if needed. The drop-down menu options are Check, Electronic Payment, and ACH (the Automatic Clearing House file that you send to the bank). The vendor’s banking information must be set up in Vendor Management before you can select ACH.
If you need to create a new vendor, click the blue ADD NEW VENDOR link beside the Vendor Nickname field. This will take you to the Add Vendor screen in Vendor Management. Once the new vendor is saved, it will take you back to the Add Invoice screen where you can create an invoice for the new vendor.
Update Invoice Account Lines
- Select the GL Account # you want to use to pay the invoice. You can scroll through the drop-down list, or you can type all or part of the account description in the GL Account # field, such as POSTAGE, to select from accounts with the same description. If you had set up a GL Distribution for a vendor in Vendor Management, the account numbers would have automatically defaulted.
- If you need to split the bill out to additional General Ledger account numbers, click the blue ADD NEW option on the grey bar. If you need to remove a GL Account row, click the red Trash Can.
- Enter the amount to be paid from that line account in the Amount Per Line field. If you had set a percentage split on default account numbers in Vendor Management, the Amounts Per Line would have automatically calculated and disbursed accordingly to each account number. You cannot Add the invoice until the Total below these amounts matches the Invoice Amount you entered on the screen above (see the screenshot).
- The Reference you enter will create the history for that line account and will be included in GL Reports. You can enter a reference up to 30 characters. The reference should have enough detail for each line account to provide an accurate recording of what was purchased or will be paid.
- The Distribution ID automatically defaults to the Fund and Bank associated with the account number you select. Typically, it defaults to Bank 1 Checking. If you want to pay a particular invoice, or item on an invoice, from a different bank, you can select the bank’s Distribution ID from the drop-down list. When Distribution IDs are selected for more than one bank when entering an invoice, the invoice for that vendor will be split into two or more checks accordingly.
- The Check Grouping field automatically assigns a fund number and sequence number of 1 to each GL account entered in the invoice. If you leave the sequence numbers as 1 for all GL Accounts, during Check Print all lines of the invoice will be included in the check.
How to Split an Invoice to Print on Two or More Checks
If you need to split an invoice into two or more checks, in the Check Grouping field select sequence number 1 for all items you want to combine and print on the first check, select sequence number 2 for all items you want to combine and print on the second check. The following invoice example will print two checks.

Applying Vendor Credit to an Invoice
If you have added credit to a vendor account on the Invoice Tab in Vendor Management, you will be able to apply that credit to the next invoice you create for the same vendor, when using the same GL Account Number(s) that the credit has been applied to.
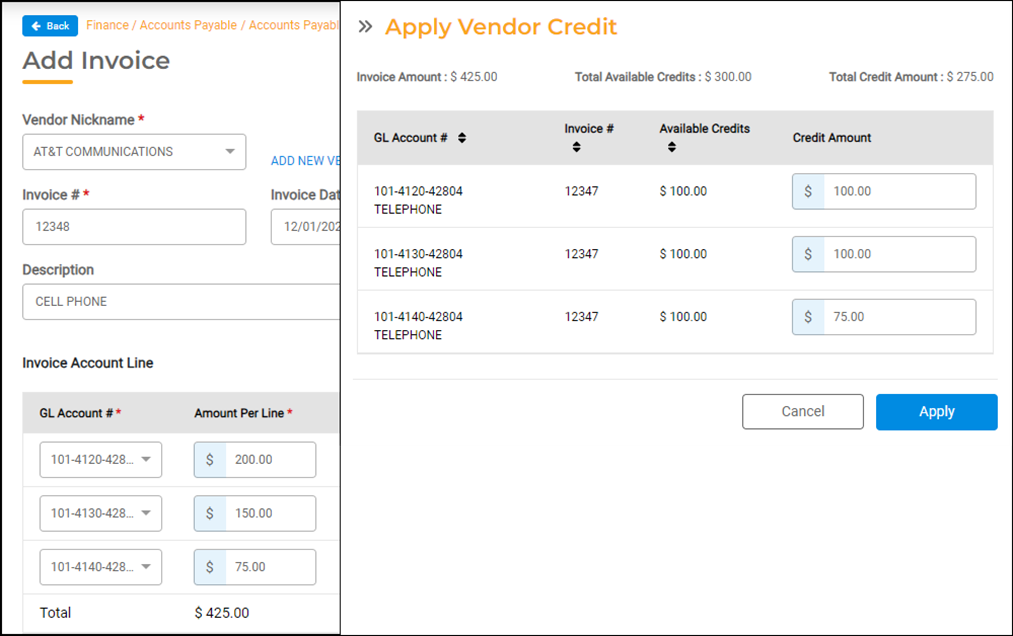
After adding Invoice Account Lines, click the Apply Vendor Credit button. The Apply Vendor Credit screen displays the Available Credits for each GL Account number. You can apply all or some credit of the available credit to each line account.
In the following example, a credit of $275 is being applied to this invoice. The available credit is $300, therefore, a credit of $25 will still be associated with the third GL Account # and can be applied to the next invoice. The check amount will be $150.00 (Invoice Total of $425 reduced by the Credit Amount total used of $275). Once you have disbursed the credit amounts, click the Apply button.
When a credit is applied, that credit will be displayed next to the Apply Vendor Credit button back on the Add Invoice screen.
Notes/Attachments
Click Notes/Attachments to expand the section. Here you can save notes about the invoice, or you may want to upload and save a copy of the vendor’s invoice with the payment. You can also add notes and attachments in Vendor Management. For more information about notes and attachments, see the Notes/Attachments section of the Adding a New Vendor help document.
Resetting or Saving the Invoice
Use the Reset button at the bottom right of the screen to clear the fields and start over without creating the invoice. Once you have completed entering all of the fields you need for an invoice, click the Add button to create the invoice.
Editing and Deleting Invoices Once Created
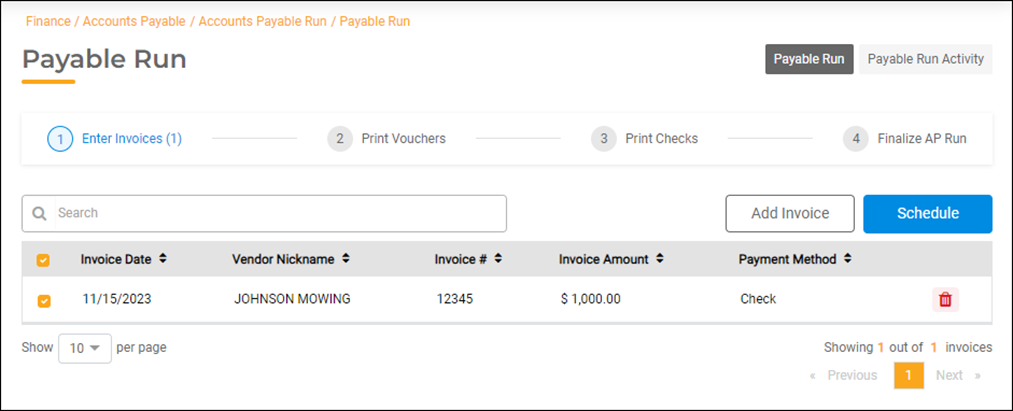
Once you have saved an invoice, it will be listed on the Payable Run Enter Invoices screen. You can edit any field of an invoice except for the vendor selection.
- Edit – To edit an invoice, double-click the invoice in the list to open the Edit Invoices screen. Make changes to any field except the vendor selection, then click the Update button to save it.
- Delete – To delete an invoice that was created for the wrong vendor, simply click the red Trash Can in the right column next to the invoice in the list. Next, click the Add Invoice button to create a new invoice for the correct vendor.
Schedule Invoices
Once you have entered invoices, you are ready to schedule invoices that you want to include in a check run. Back on the Payable Run screen, click the checkbox next to each invoice you want to schedule, or click the checkbox in the grey bar to select all invoices. Click the Schedule button.
Print Claims Report
Print Claims Report for Scheduled Invoices
After creating and scheduling invoices, print the Claims Report for Scheduled invoices to verify that what you entered accurately reflects each invoice that you need to pay. This listing, when final, should be kept with your Accounts Payable Run for your auditor. For more information, read Accounts Payable: Claims Report for Scheduled Invoices.
If you find a discrepancy when comparing a vendor invoice to the scheduled claims listing, you will need to unschedule the invoice before you can edit it. To unschedule the invoice, click the Print Checks step on the Payable Run screen. Then, click the Unschedule button next to the invoice you want to edit.
Print Claims Report for Council
If this is your final AP Run before Council Approval, after entering and scheduling invoices and ensuring that they are accurate, you can print the Claims Report for your council meeting.
2. Print Vouchers
Some states, such as South Dakota and Kansas, require cities to print vouchers for each invoice. Some cities use vouchers even though their state does not require them. If you do not use vouchers, you will not have the Print Vouchers step displayed on your screen. Skip to the next section.
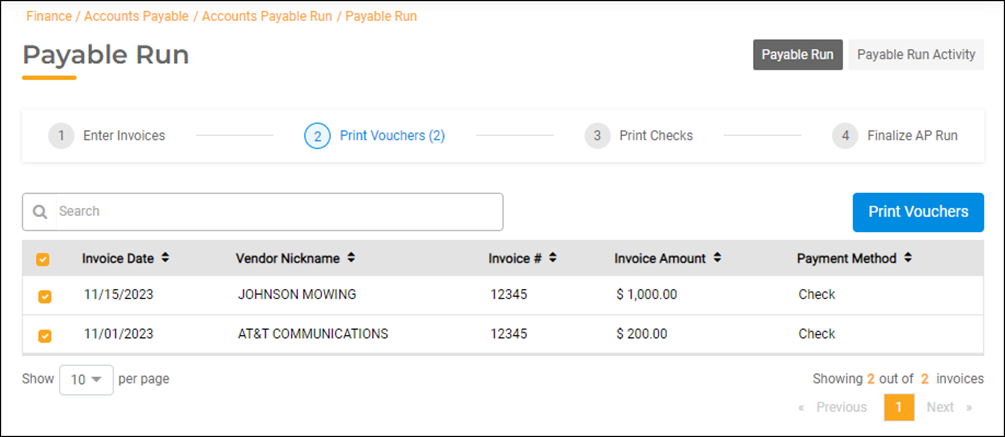
To print vouchers, first, click the Print Vouchers step on the Payable Run screen. Select the vouchers you want to print by checking the checkbox next to each invoice. You can also click the checkbox in the grey bar to select all invoices. Once you have selected the invoices to include, click the Print Vouchers button on the right.
A Print Preview will display each voucher. Click the Printer button on the top right of the screen to select your printer, and then click the Print button to print vouchers.
Re-Printing Vouchers
You can Reprint Vouchers as many times as needed before Finalizing the AP Run. Simply go back to the Print Vouchers step, select the vouchers you want to print, and click the Print Vouchers button.
3. Print Checks
The next step in the Accounts Payable Run is to Print Checks. Click the Print Checks step on the Payable Run screen.
Click the Print Checks step on the Payable Run screen.
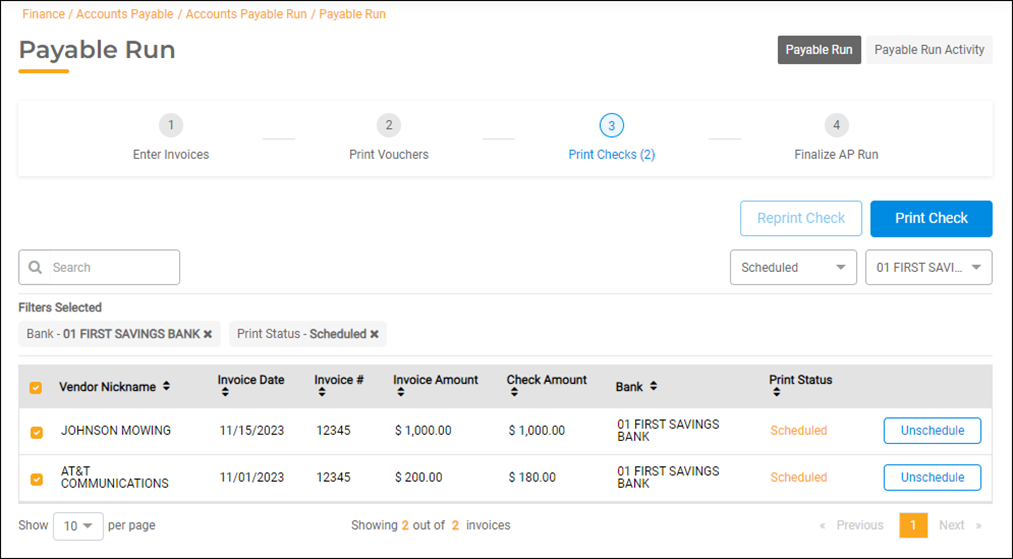
The Bank defaults to Bank 1 Checking in the drop-down list on the right side of the screen. If you print checks from other banks, you will select and print checks for each bank one at a time. Scheduled invoices for a selected bank will be listed.
When you are ready to print checks, select the bank, then select the vendors in the list to include in the check run by clicking the checkbox next to each vendor. You can also click the checkbox in the grey bar to select all vendors. Once you have selected the vendors to include, click the Print Check button on the right.
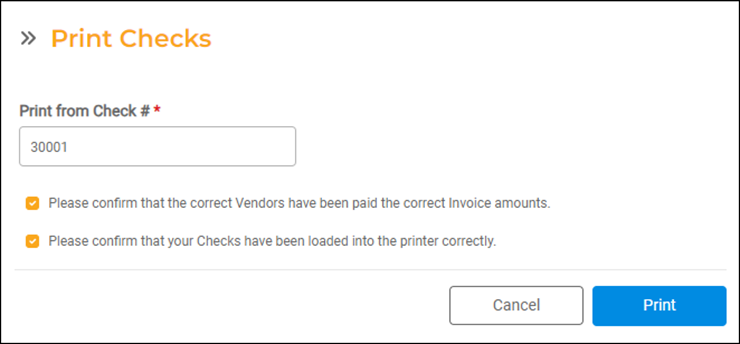
The Print Checks screen will open. Verify that the default check number displayed is the next check number that you will load into the printer. Load your checks into the printer. After clicking the checkboxes next to the two questions displayed on the screen to confirm, click the Print button.
Viewing Printed Checks
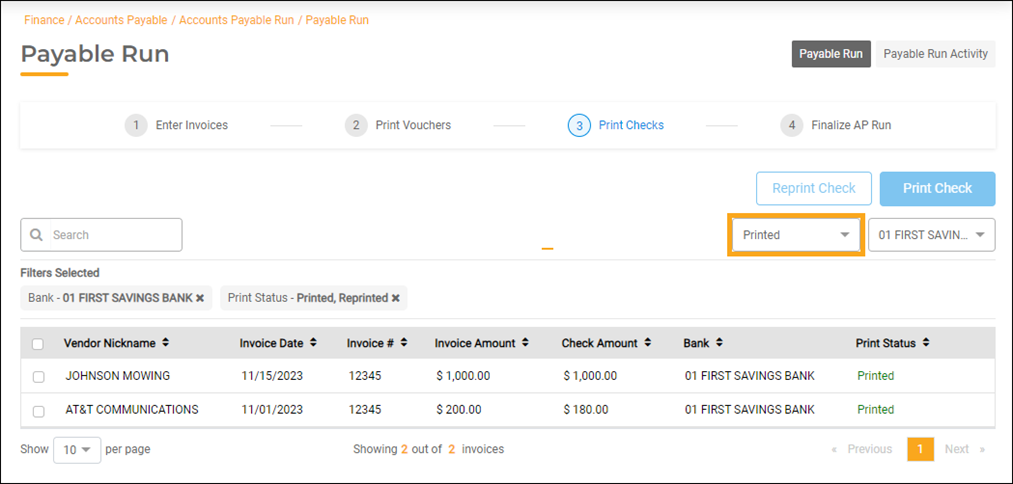
You can view the checks that you have printed and not yet finalized, by selecting Printed instead of Scheduled from the drop-down menu located under the Reprint Check button.
Reprinting and Reassigning Checks
If you need to reprint damaged checks, see the Reprinting Damaged AP Checks help doc for further instructions. If you need to reassign check numbers because they printed out of sequence, you can do this after Finalizing the AP Run. See the Reassigning AP Check Numbers help doc. These help docs are linked at the end of this document.
4. Finalize the Accounts Payable Run
After printing checks, click the last Finalize AP Run step on the Payable Run screen. Here you will create the NACHA File for vendor ACH payments (if applicable) and Finalize the AP Run to complete it.
Create the NACHA File (if applicable)
If ACH Vendors were included in the Accounts Payable Run, click the Create NACHA file button to create the file that you need to provide to your bank.
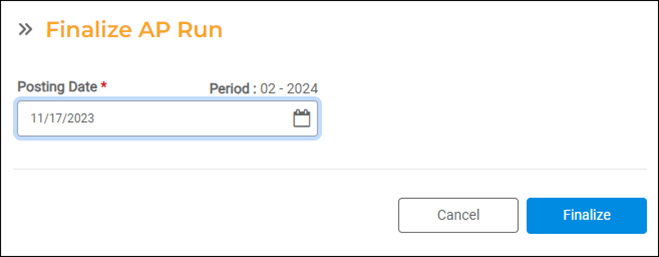
Finalize AP Run
It is important to review your checks carefully after printing them and before Finalizing your AP Run. You cannot reprint vouchers or checks after the Accounts Payable Run has been finalized. To complete your check run, click the Finalize AP Run button.

The Finalize AP Run screen will open. You must enter the Check Date of the AP Run that you are completing in the Posting Date field. This will ensure that the checks will update to the correct posting period in Bank Reconciliation and General Ledger. Click the Finalize button to complete your AP Run.
Print a Check Register
The Check Register can be printed in Finance Hub > Reports. The Check Register is a succinct report that sums up the AP Run that you just completed. The report will list checks in Check # order for each bank that you select. You can export the report to create an Excel or PDF document. Along with the Invoices, Vouchers, and Check Stubs, gWorks recommends filing together a PDF version of the Check Register and the Claims Report for Scheduled invoices (that you printed in Step 1) for each Accounts Payable Run. See the help doc, Check Register Report, for more information on printing this report.