Setting Up a New Vendor
Setting Up a New Vendor
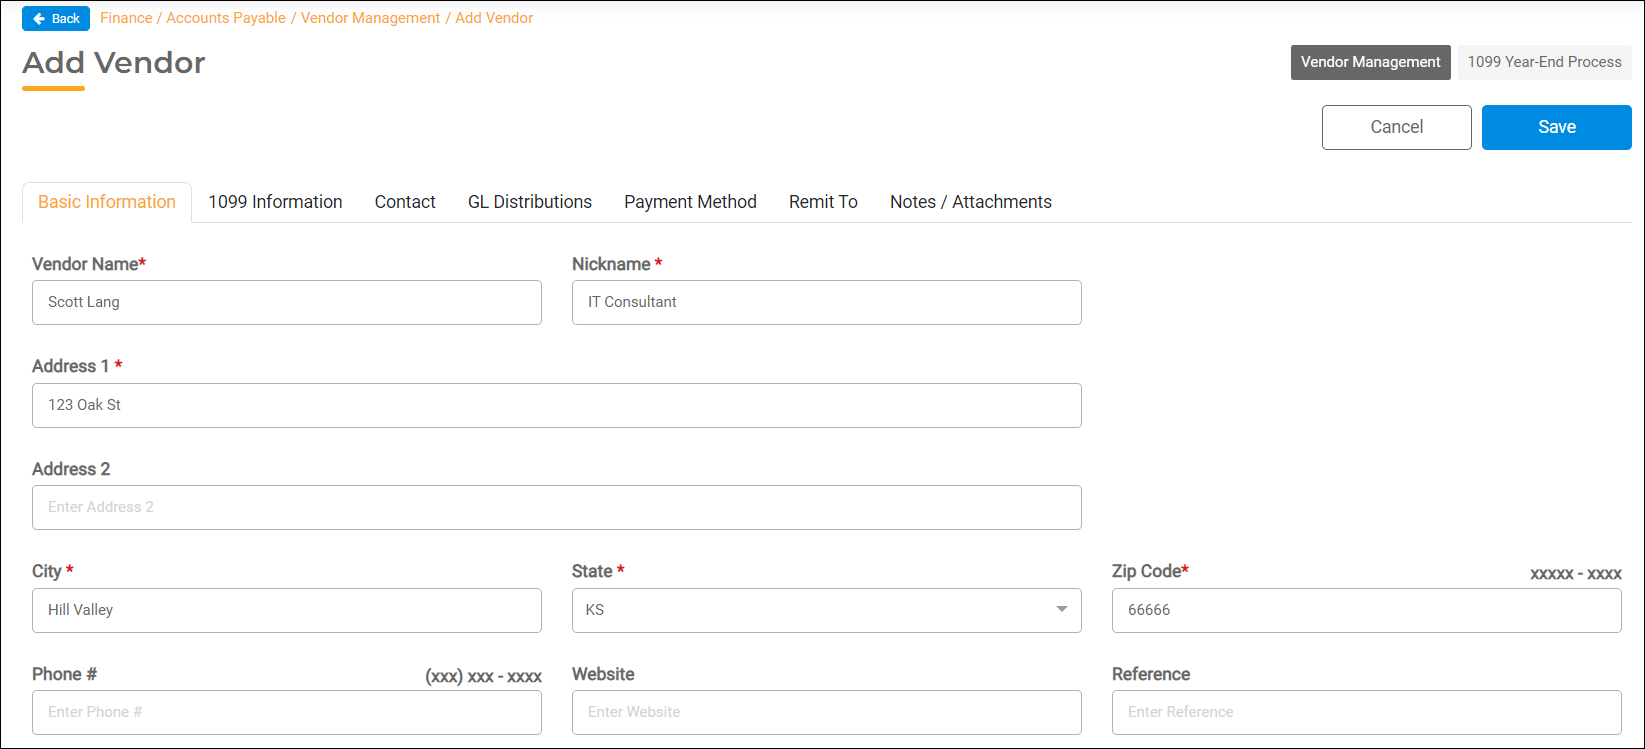
You can easily set up a new Vendor in Finance Hub > Accounts Payable > Vendor Management.

- Click Add Vendor.
- Vendor Name – Include the full name of the Vendor. The Vendor Name will print on checks.
- Nickname – Assign a nickname to the vendor to help you quickly find it when viewing, maintaining, and creating invoices.
- Enter the Vendor’s contact information.
- Once you have verified that all of this information is correct, click Save.

Additional Tabs
You can enter additional vendor information on the following tabs:
- 1099 Information - set up vendors to receive 1099s
- Contact - enter contact information for a specific person
- GL Distributions - enter General Ledger accounts to default when entering invoices
- Payment Method - select a default payment method
- Remit To - enter information to remit invoices to a different entity
- Notes/Attachments - enter notes and attach files
1099 Information
Fill out fields in the 1099 Information Tab if the Vendor is a 1099 Vendor.

- Select the 1099 Account Type.
- 1099-NEC – all non-employee compensation. This will be printed on the 1099 NEC Form in Box 1.
- 1099-M-ATTY – all gross proceeds paid to an attorney. This will be printed in Box 10. This is for vendors that are attorneys to which you are paying a claimant’s damages. Legal Fees paid to your city attorney in the course of business are reported as 1099-NEC.
- 1099-M-OTHR – all other miscellaneous compensation. This will be printed on the 1099 MISC form in Box 3.
- Enter the Tax ID provided on the W-9 Form that you collect from each vendor. If you are working with an individual you can select SSN and enter the individual’s SSN.
Contact
Entering information is optional. This tab is to be used for any additional contact information not included in the Basic Information tab.
GL Distributions
This tab allows you to default General Ledger accounts when creating an invoice for vendors whose invoices are frequently expensed to the same GL Accounts.

If you choose to utilize this tab, fill in the following fields:
- GL Account #. If a vendor invoice should be split by percentages to several funds and/or departments, select each of the accounts you would like the invoice to be split by.
- Percentage. You have two options available to you for this field:
- You may leave these fields blank if you wish to enter amounts when creating an invoice.
- You can enter percentages in the Percentage fields for each expense account and the amounts will be calculated automatically when creating an invoice.
Payment Method
Select which Payment method you would like to use to pay vendor invoices.
Remit To
This tab is optional and only necessary if the vendor wants the invoice payment sent to a different address or entity.
Notes/Attachments
The Notes/Attachments tab in Vendor Management can be used to record notes about the vendor and attach files.

- Notes. Type up to 2000 characters in the Notes box, then click Save. To remove a note, use the Delete or Backspace keys to remove it and click Save.
- Attachments. If you wish to attach a file, such as the vendor’s W-9 Form:
- Click Choose in the attachment field and browse for the file you wish to attach. You can select as many files as you would like. Supported file formats are .png, .jpeg, and .pdf with a maximum file size of 5 MB.
- Click Upload. The attached files will be listed in the box below.
- You may select the blue download arrow to view your files or select the red trash can to delete them.
If you upload a file to a Vendor account, you will be required to add a Note.

