How to Configure Meters
 Updated
by
Janelle Heuton
Updated
by
Janelle Heuton
Meters will always reside in Operations Hub in the Meter Inventory. Even if you do not have the full version Operations Hub enabled, meters will exist in the Asset Repository and will be associated with a Utility Account vai Service Location and a specific Service.
The consumption for a meter may depend on certain settings for each meter such as the multiplier, digits, or read type. It's important to configure the Meter Types so all these inputs are set for each Meter Type.
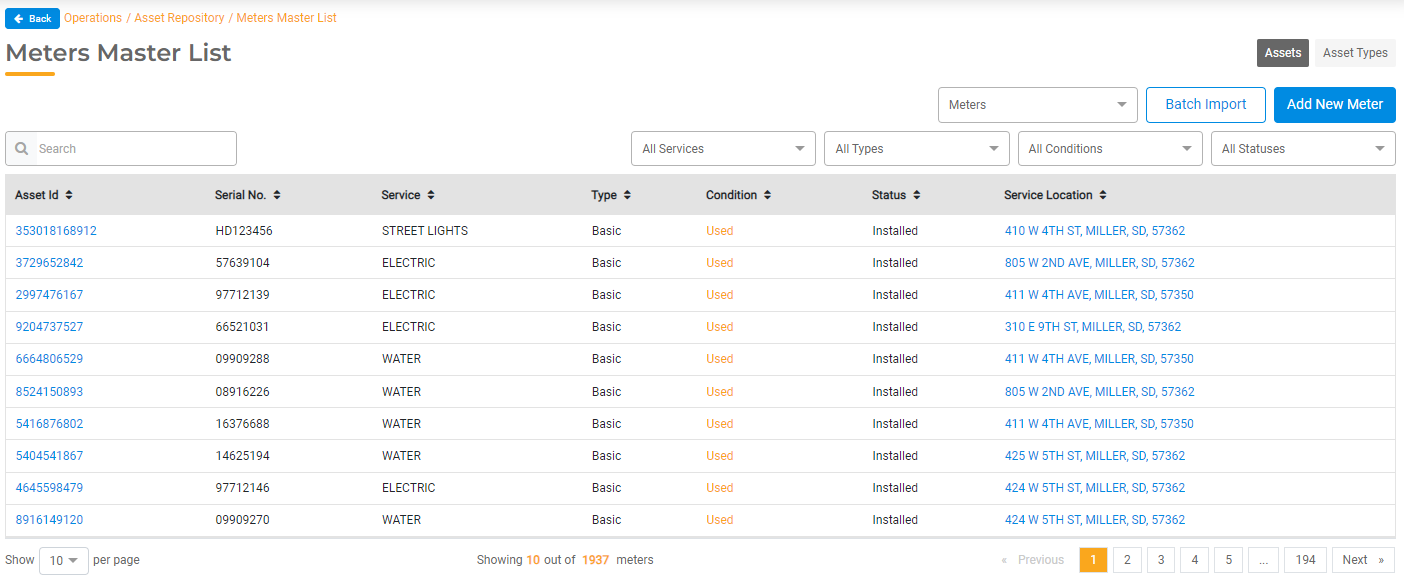
To view, add, or edit meters, go to Operations > Asset Repository > Meters. Here you will see a list of all meters set up for your Agency. To view or edit meter details, select a meter from this list.
Meter Types
Utility Billing Hub works with the following Meter Types:
- Basic Meters: one reading per meter
- Compound: the consumption is based on adding the consumption from two different related meters.
- Demand: the consumption is based on two reads per meter: the maximum amount of kwhours pulled from the grid since the last time you read the meter plus the regular consumption for that meter. Demand Meters are always electric meters. Other factors may impact the consumption calculation such as the demand ratchet. For example, these meters care about the peak usage by looking at the highest number being pulled at any given moment in the billing cycle. This number should reset each time the meter is read. Each reading could have its own multiplier. It may also have a Ratchet, Demand Tracking Percent, and Demand Factor that is specific to a meter.
- Subtract Meters: a group of related meters where the reading is derived from multiple meters.
- Time of Use: the consumption is based on two reads per meter.
- Net Meters: the consumption is based on two reads per meter.
Subtract Meters
Subtract Meters are basic or compound meters that are physically associated with other meters. This can be in a parallel sequence or as a series.
- Parallel Subtract meters are subtract meters connected so that the supply goes through the first meter, then is distributed to the other meters separately. When connected in parallel, consumption is only adjusted for the FIRST account in the string (aka master meter). The consumption amounts for the others are not affected.
- Series Subtract Meters are subtract meters connected so that all water in the line runs through one meter and then to the next meter, which means the water used by the second meter increases the consumption of the first. For series, consumption is adjusted on all accounts but the last in the series.
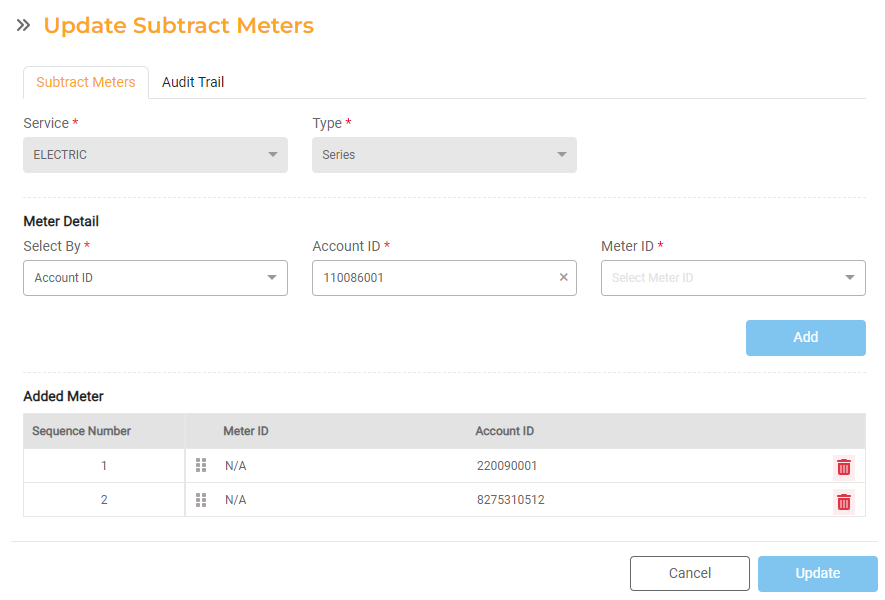
Configuration for Subtract Meters can be found in Utility Billing > Settings > Subtract Meters. You can configure which meters are part of the configuration, whether the series is parallel or series, and the position of each meter. Once this is configured, the information for each meter will be available in the Service details section on the Utiltiy Account Details page.
- Service: Select the Service associated with the Subtract Meters.
- Type: Select Series or Parallel.
Next, you'll have the opportunity to select which meters belong in this configuration. You can add each individual meter by inputting the Meter ID directly or by filtering for Account ID first and then choosing the correct meter.
- Meter Detail
- Select by Meter ID: Enter the Meter ID. The Account ID should automatically populate.
- Select by Account ID: Enter the Account ID. The Meter ID should automatically populate.
Add each Meter that should belong in the sequence.
- Meter Sequence Configuration
- Series Meters: The Sequence Number for the selected Meters will populate. This will determine the position of each meter and the formula used to calculate consumption. The Sequence should start with one and must be continuous, ie 2, 3, 4, 5 so that a sequential number is assigned to each meter in the Series. You can select and drag the Meter ID up and down so that each Meter is associated with the correct Sequence Number.
- Parallel Meters: Once the individual meters have been added, they will populate below. If your Subtract Meter is set to Parallel, you will select which meter is the parent meter. The parent meter is the meter through which all consumption flows before getting divided into the child meters. The other meters in the configuration will update to be child meters. Only one parent meter is allowed.
Adding Meters
You can meters individually or you can batch import meters. Select Batch Import to upload a file. The file must be formatted in a specific way for the batch upload. Click the Download sample template link to download a sample file with the necessary format. You can use this file to add all the Assets you wish and save the file. You must keep the format the same as the same file: leave the column headers as-is and add the Asset Details below. Upload the updated file by clicking Choose file and selecting the Excel spreadsheet from your computer. Click Import to complete the batch import.
For more information, read How Assets Work.
Default Attributes
All Meters will require default data:
- Asset ID: Asset Type will be a unique identifier generated by Operations Hub. This field is not editable.
- Asset Type: Asset Type will automatically be populated to Meter. This field is not editable.
- Service: selected from a dropdown menu. Once added and saved, this will not be editable.
- Serial Number: a unique number that can be a combination of numbers and letters. Once added and saved, this will not be editable.
- Meter Type: selected from a dropdown menu. Options include Basic, Compound, Demand, Time of Use, and Net meters. Once added and saved, this will not be editable.
- Condition: selected from a dropdown menu. Note, if you select "junk" as the type, the Meter Status will automatically update to "Junk."
- Status: selected from a dropdown menu. Options include:
- In Storage. This is the default status for any new Meter.
- Installed
- Junk
- In Repair
- Meter Seal Number: The Seal Number for the meter, if applicable.
- Remove Serial Number: The Remote Serial Number, if applicable.
- Reading Display: Options include Analog or Digital. Once added and saved, this will not be editable.
- Service Location: The Service Location where the Meter is installed.
- Installation Date: Date the Meter was installed.
- Multiplier: Once added and saved, this will not be editable.
- Digits: Once added and saved, this will not be editable.
- Read Type: Options include Manual Read, Radio Read, Cellular Read, or Touch Read. This setting will determine how the meter reading is taken. Once added and saved, this will not be editable.
- Read ID: This is required field if the Read Type is Radio, Cellular, or Touch Read. Only one Read ID is required, but you may input multiple IDs as needed.
- MR Vendor Software: The Meter Reader Vendor assocaited with the Meter.
- Longitude: x-coordinate for the Meter's location.
- Latitude: y-coordinate for the Meter's location.
- Notes: Editable text field to add notes or comments.

Additional Attributes
Depending on your Meter Type and Service, additional Attributes may default based on the settings above. Those include things like Demand Decimans, Route Sequence, Demand Read Type, Dials to Read, Meter Size, and more.
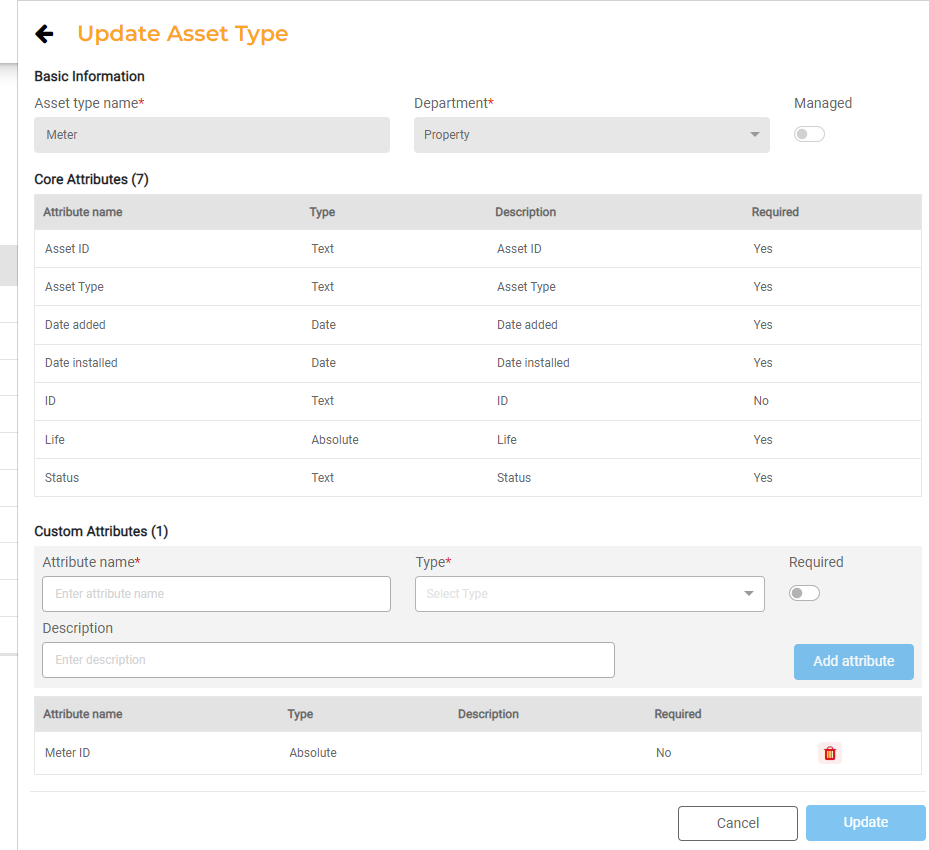
Custom Attributes
In addition to the required fields above, you can configure additional attributes for each Meter. To do this, select Meter from the Asset Repository. You can update the Asset Type by configuring additional Custom Attributes.
For each Custom Attribute, include the Name, Type, Description, and indicate whether that Attribute should be required. Click Add Attribute.