How to Configure Rate Tables
 Updated
by
Janelle Heuton
Updated
by
Janelle Heuton
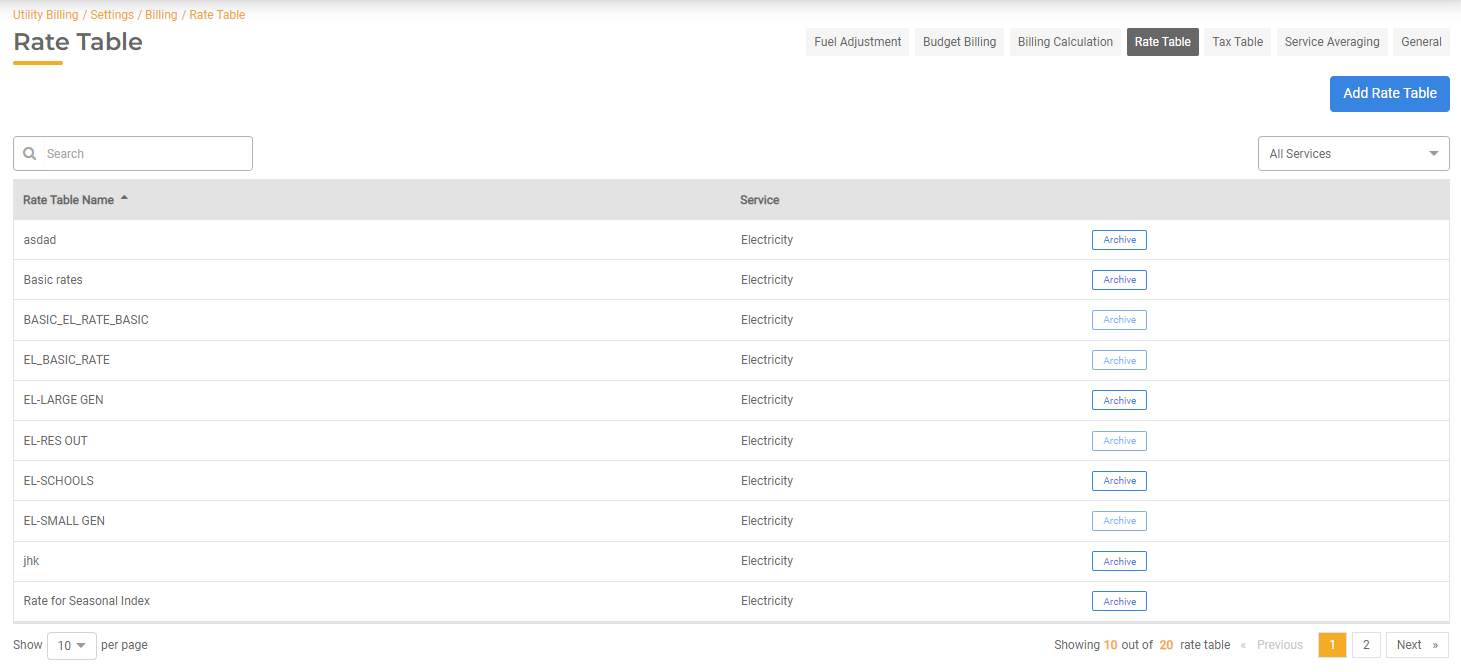
Rate Tables are configured in Settings. To view and configure Rate Tables, open Utility Billing > Settings > Rate Tables.
The Rate Tables page will display all Rate Tables set up in Utility Billing Hub. You can see the Rate Table Name and associated Service. To view or edit a Rate Table, select it from the table.
Add a Rate Table
To configure a new Rate Table, click Add Rate Table. The Service you select will populate meter or flat rate options based on whether that Service is configured to be metered or not. For metered services, you'll have the opportunity to configure the tiers and other charges. For flat rate services, you'll have the opportunity to configure rates and units.
Metered Services
Based on the configuration in the Service Settings, a Service is Metered or not. This setting will determine the available Rate Table Settings. For example, Water, Electricity, and Gas are usually Metered Services.
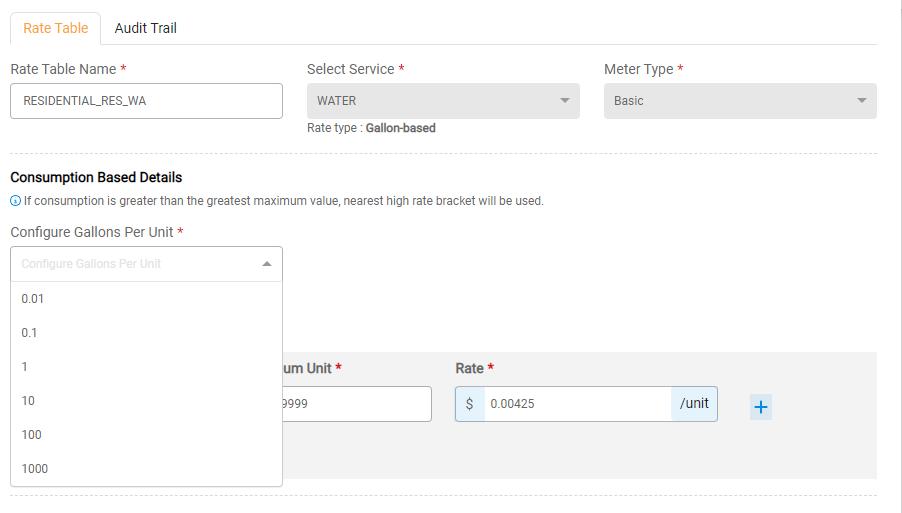
- Rate Table Name: First, add a Name for the Rate Table. The name should be unique and accurately describe the Rate Table. For example "Electricity: Residential."
- Select Service: This list will be populated with all active Services. If a Service is not listed here, open Settings > Services and Add a Service.
- Meter Type: Basic Rate, Demand, or Time of Use. The configuration below will update based on the Meter Type selected here. See below to set up Demand or Time of Use Meters.
- Consumption-Based Details.
- If Water is selected as the Service, configure the Gallons Per Unit. If your water rate ordinance is in any unit other than gallon, you must specify the conversion required. Gallon per unit should be in a power of 10. For example 10, 100, 0.01, 0.001. If you bill 10 Gallons per Unit, the calculated consumption will be divided by 10 before consumption is rounded.
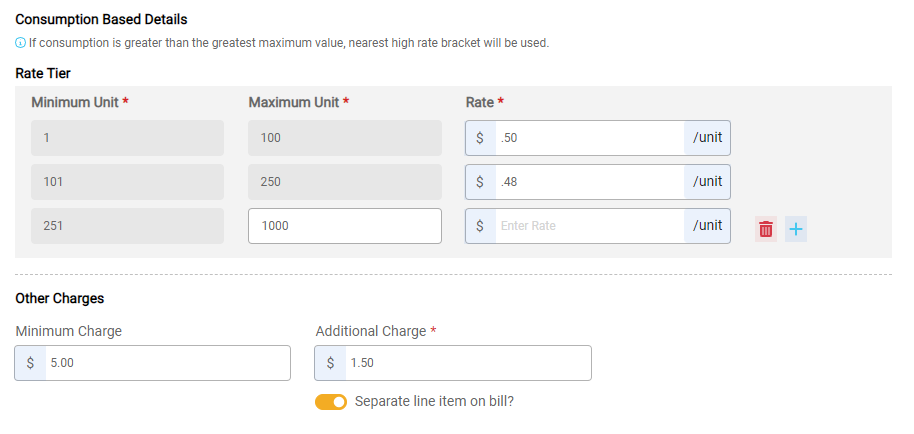
- Rate Tier: Enter the rate tiers in the table provided. You can create multiple tiers by clicking on the + button. For each rate tier, enter the Minimum Unit, Maximum Unit, and associated Rate. You cannot add overlapping tiers. You can delete the last row in the table by clicking on the trash can icon.
- Minimum Charge: Enter Minimum Charges, if applicable. The Minimum Charge will be applied each billing period for the selected Service. If there is no Minimum Charge, leave this field blank.
- Additional Charge: Enter Additional Charges, if applicable. For example, you may charge a $1.50 recurring convenience fee for electronic billing. The Additional Charge will be applied each billing cycle. Indicate whether the Additional Charge should be included as a separate line item on the bill by turning the toggle on. If this toggle is off, the Additional Charge will be included with the consumption charges.
- If Water is selected as the Service, configure the Gallons Per Unit. If your water rate ordinance is in any unit other than gallon, you must specify the conversion required. Gallon per unit should be in a power of 10. For example 10, 100, 0.01, 0.001. If you bill 10 Gallons per Unit, the calculated consumption will be divided by 10 before consumption is rounded.
- Seasonal Rate: if you use seasonal rates, or different rates for different parts of the year, toggle Seasonal Rate on.
- Enter a Label for the Seasonal Rate, Start Date, and End Date. All consumption charges that occur within that defined period will be charged based on the Seasonal Rate input below.
- You can then input the Minimum Unit, Maximum Unit, and Rate associated with that Rate Tier. Add additional tiers by clicking the + button.
- Enter Minimum Charges that will apply to the Seasonal rate, if applicable.
- Select Add to save the Rate Table.
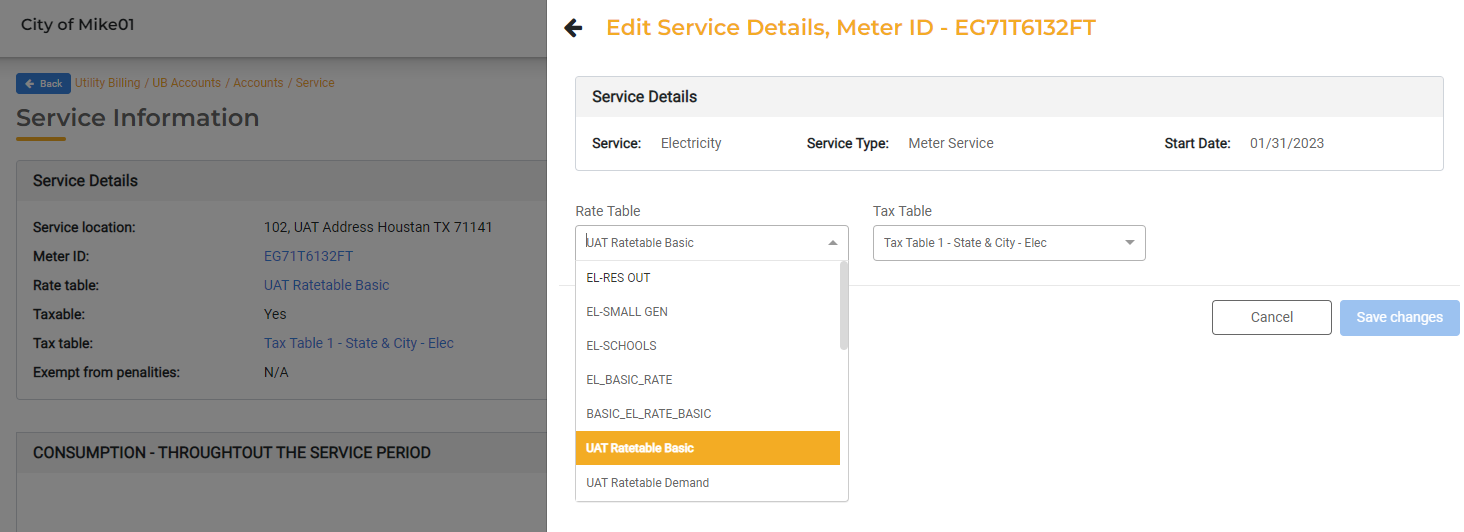
The Rate Table can now be associated with a specific Meter. To update the Rate Table for a Meter, select the Account and then select the Service within the Account. This will display the Meter ID, Rate Table, and Tax Table. Click Edit to update any of this information.
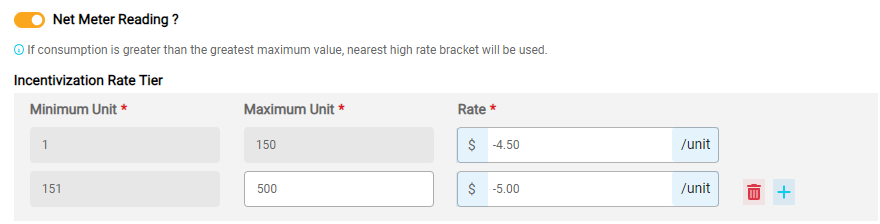
Net Meters
If Electricity is selected as the Service, you have the option to enable a Net Meter Reading. Net Meter Readings are used for Solar Meters when the Account is charged the net of consumption produced vs consumption charged. In this case there are two readings: one for the electricity provided by the city and one for the electricity generated by the solar panel. A credit will be provided to an account based on the generated electricity and the incentivization rate entered here.
If you use Net Meter Reading, toggle Net Meter Reading on. You can then input the Minimum Unit, Maximum Unit, and Rate associated with that Rate Tier. Rates must be negative to reflect the credit that will be provided. Add additional tiers by clicking the + button.
Demand Meters
A demand meter is a type of electric meter that measures additional demand for electricity in addition to normal consumption. They are normally used in high-usage businesses. Demand meters register the highest rate of electrical flow (or current) during a billing period, usually in 15 minute intervals. The customer is billed for the highest average 15 minute flow during the billing period in addition to their regular consumption.
For example, if within one billing cycle your demand reaches 50 kW and stays there for 15 minutes, the meter needle remains at 50 kW unless or until your demand exceeds that level. If your demand later reaches 55 kW and stays there for 15 minutes, the needle will then stay at 55. The new index point is maintained, even when you are using electricity at below 55 kW, until the meter reader comes to record the demand and resets the meter back to zero.
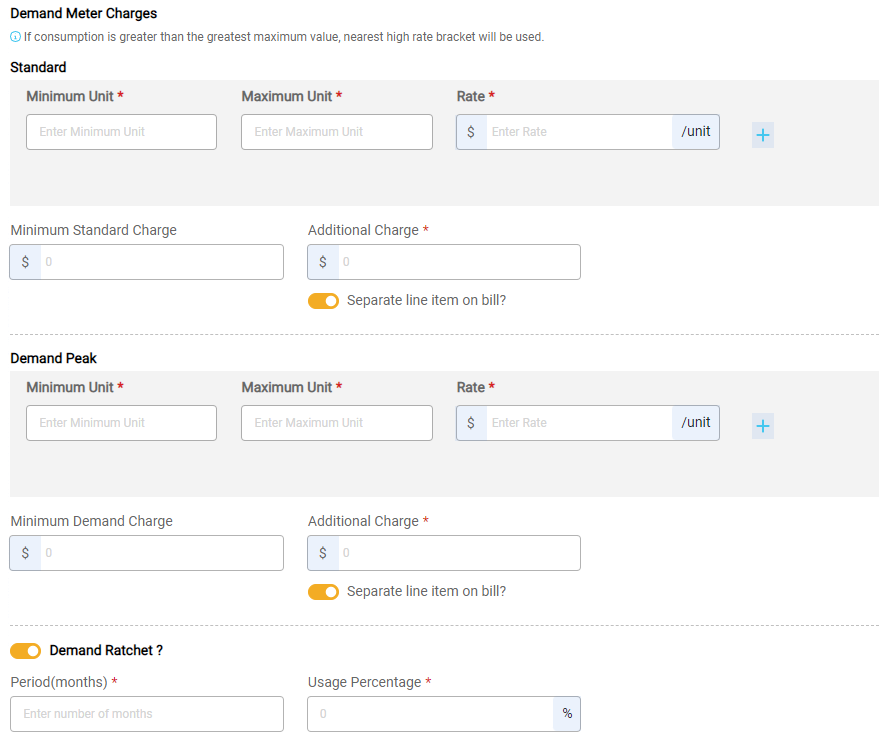
If you selected Demand as the Meter Type, you will configure rates for the Demand Peak and Demand Ratchet. Deman Ratchet calculates the Deman Factor as the peak use over a certain number of trailing months multiplied by a percentage.
- Standard Charges: Configure the Minimum, Maximum, and associated Rate used for the regular consumption. You can create multiple tiers by clicking on the + button.
- Minimum Standard Change: The Minimum Charge will be applied each billing period for the selected Service. If there is no Minimum Charge, leave this field blank.
- Additional Charge: Enter Additional Charges, if applicable.
- Demand Peak: Add the Minimum Unit, the Maximum Unit, and the Rate to be used for calculating the charge for the Peak. You can create multiple tiers by clicking on the + button.
- Minimum Demand Charge: Enter if applicable.
- Additional Charges: Add for the Demand Peak, if applicable.
- Demand Ratchet. If you use Demand Ratchet, turn the toggle on. Enter the Period (number of months) and Usage Percentage. The Period determines the number of months for historical data and the percentage of the usage amount. If the Demand Ratchet is off, the Demand Factor will be equal to the Demand Reading.
Time of Use Meters
Time of User Meters can be used to charge different rates for different times of the day. If you selected Time of Use as the Meter Type, you will configure Time of Use Meter Charges (default charges) and Custom Interval Charges (different charges for different time periods). This will calculate separate readings for different times of the day at the interval. For example, you may charge a peak rate from 5pm until 8pm and the basic rate for the rest of the 24 hour period.
- Default Charges: Enter the Default Rate Charges that will be used outside of the Custom Interval Charges defined below. Enter the Rate Tier for that Interval Charge in the table provided. You can create multiple tiers by clicking on the + button. For each rate tier, enter the Minimum Unit, Maximum Unit, and associated Rate. You cannot add overlapping tiers. You can delete the last row in the table by clicking on the trash can icon.
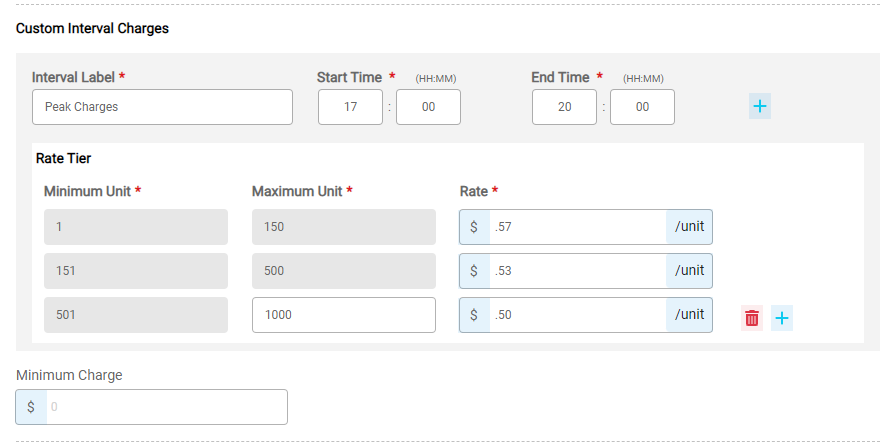
- Custom Interval Charges: Define any charges and the time of day which they will apply. These settings will supersede the default tier for the configured time period.
- Interval Label: Add a Label for reference.
- Define the Start Time and End Time for the Interval. All time should be entered using a 24 hour clock (military time) to prevent mistakes. You can create multiple Intervals by clicking the + button. Time Periods cannot be overlapping. Intervals can be set up in 15 minute intervals at the minimum.
- Rate Tier: Enter the Rate Tier for that Interval Charge in the table provided. You can create multiple tiers by clicking on the + button. For each rate tier, enter the Minimum Unit, Maximum Unit, and associated Rate. You cannot add overlapping tiers. You can delete the last row in the table by clicking on the trash can icon.
- Minimum Charge: The Minimum Charge will be applied each billing period for the selected Service. If there is no Minimum Charge, leave this field blank.
Non-Metered Services
If the Service selected is Not Metered, you can configure the Rate Table to accommodate Flat Rate Billing. For example, Garbage is billed at a flat rate per unit. When adding a Rate Table for non-metered services, you have the option to select a Basic Rate Type or Flat Rate Type.
- Basic Rate is used to set up tiers to determine a price per unit.
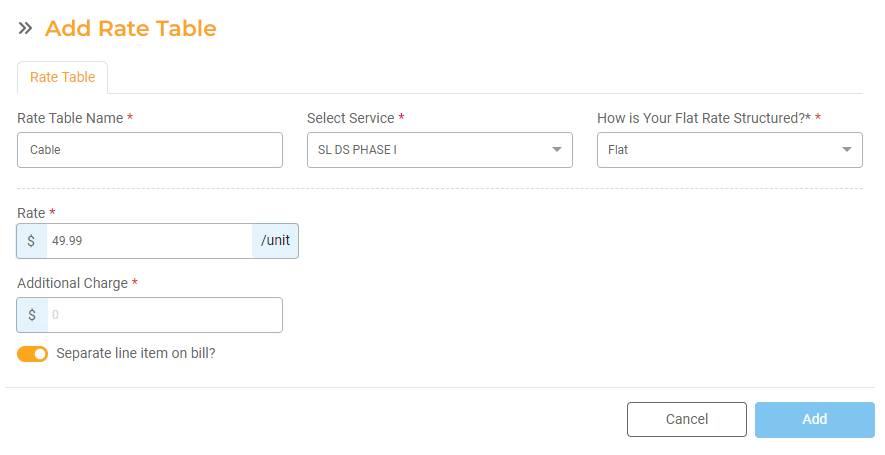
- Flat Rate is used to set a flat amount that is charged. For example, you may charge a $49.99 for Cable Service. This will charge each applicable Utility Account the same $49.99 fee.
Flat Rate Tables
Select Flat Rate to charge each Utility Account the same rate. For example, you may charge a $49.99 for Cable Service. This will charge each applicable Utility Account the same $49.99 fee. Flat Rate can also be used for surcharges or primacy fees.
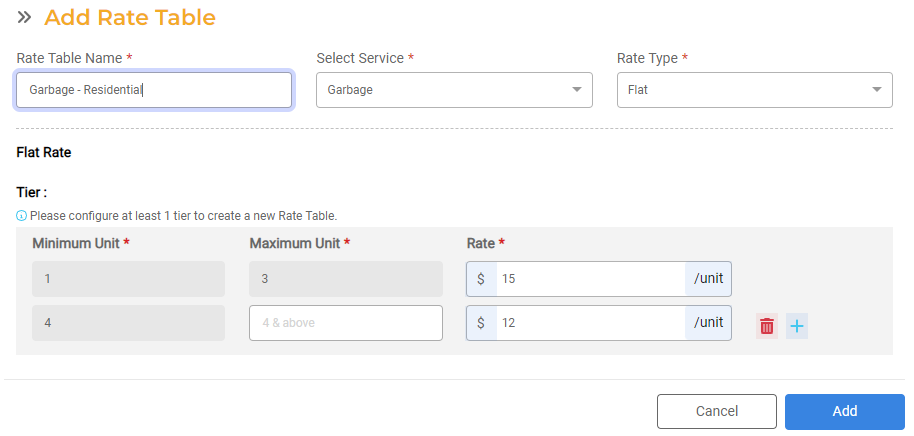
Basic Rate Tables
You can configure a Basic Rate table if you have a flat rate per unit that may change depending on how many units you have. For each Rate Tier, enter the Minimum Number of Units and Maximum Number of Units, and Rate that applies to that range. You can add additional tiers by clicking the + button.
For example, you may charge $15 per garbage can for the first three units, and $12 per garbage can for any additional unit:
Enter Additional Charges, if applicable. The Additional Charge will be applied each billing cycle. Indicate whether the Additional Charge should be included as a separate line item on the bill by turning the toggle on. If this toggle is off, the Additional Charge will be included with the consumption charges.
Modify an Existing Rate Table
To make changes to an existing Rate Table, select the Rate Table you wish to edit from the Master List. This will open the details of the Rate Table which can be edited. You can edit the rates and other charges. Please note that the Service and Meter Type are not editable. All edits will be tracked and available in the Rate Table Audit Log.
To Archive an Existing Rate table, click the "Archive" button in the master list. You will have the option to restore the Rate Table if needed.