How to Configure Invoice Templates
 Updated
by
Janelle Heuton
Updated
by
Janelle Heuton
Utility Billing Hub supports a wide range of configuration for invoices. When you complete a Billing Run and post bills, the bills will be generated based on the Invoice Format and Type associated with each Utility Account. To manage your Invoice Templates, go to Utility Billing > Settings > Invoices.
Here you can configure templates for both postcard bills and full page bills. All templates available in this master list will be available to associate with any individual Utility Account.
If you have multiple Invoice Templates, you can select which one will be the Default Invoice Template by turning the toggle on in the last column of the table. The Invoice Format for all newly created Utility Accounts will default to this template automatically.
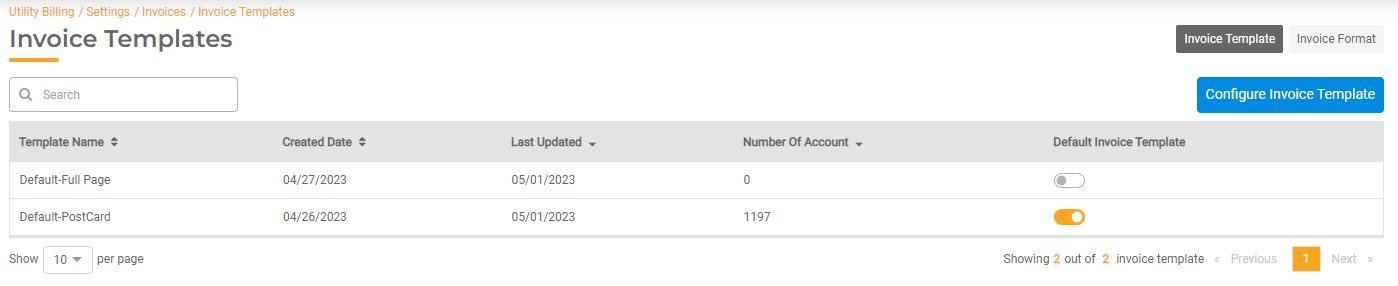
To view or edit an existing template, select it from the Invoice Templates master list. To create a new Invoice Template, click Configure Invoice Template and follow the steps below.
Configure Invoice Templates
You can configure each element of a bill so you can print your bills directly on your bill forms. gWorks will automatically populate two default templates: a Default Postcard Bill Template that will work for standard 3-up legal sized perforated postcards and a default Full Page Template You can choose to use these templates or create your own. To create your own, click Configure Invoice Template and follow the steps below.
- Invoice Formats: Choose whether you want to create a Postcard Bill or a Full Page Bill.
- If you choose Postcard Bill, you have the option to configure the Postcard Length and Postcard Width in inches. This will update the space below to match your postcard size.
- If you choose Full Page Bill, select the Paper Size.
- Template Name: Include a unique name for the template you are creating. This is the name that will appear in the Template Master List and in the dropdown when selecting an Invoice Template for a Utility Account.
- Orientation: Choose whether the image should be portrait or landscape.
- City Logo: Click Choose File to select an image of your logo that you can include on the bill. The logo will be added to the top-left header of the invoice template.
- City Address: Type the City Address to be included underneath to the logo.
- Overlay Type: Choose custom to upload your own overlay. The overlay is the pre-printed portion of the bill that you wish to print directly onto.
- Select Overlay: Choose a file from your desktop that will be used as the overlay. This allows you to upload a scan of your current postcard bill so that the scan will appear in the top section of the screen. You can use this overlay to place the Invoice Elements exactly where they should appear on your printed bill.
- Invoice Elements: Each invoice element represents a piece of information that will automatically populate in the bill. Drag and drop the invoice elements into the blank section where they should appear on the bill when printed. If you first upload the overlay of your scanned bill, this will greatly increase accuracy.
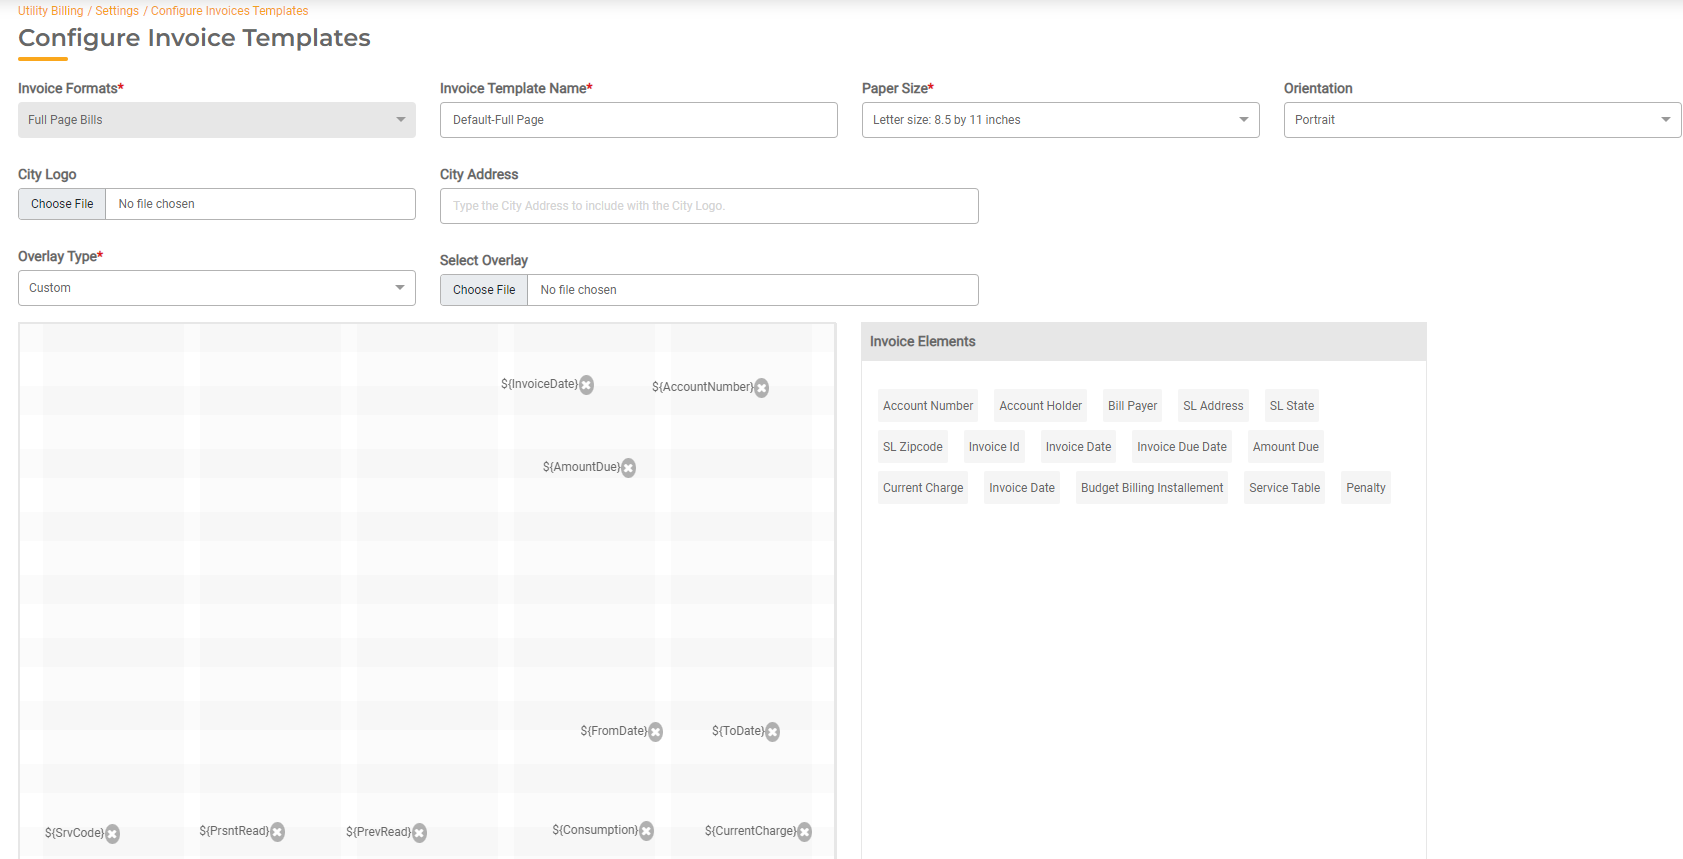
- Print Template. You have the option to configure font, margins, and other items so you can print a preview and test the bill printing.
Postcard configurations:
- Paper Length (postcard only)
- Paper Width (postcard only)
- Font Name: Choose a font
- Font Size: Enter the font size
- Top Margins: Enter the top margin inches
- Left Margins: Enter the left margin inches
- Bottom Margins : Enter the bottom margin inches
- Right Margins: Enter the right margin inches
- Number of Postcards Per Sheet (postcard only)
- Upload Blank Print Sheet (postcard only)
Click Print Preview to create a preview of your bill. We recommend printing the bill directly on your form to test for accuracy. Based on the sample print, you can adjust any of the configurations above.
Click Save to save your Template. It will now be available to select in the Invoice Format dropdown list in the Summary section of a Utility Account's Account Detail Page.
Configure the Invoice Line Items
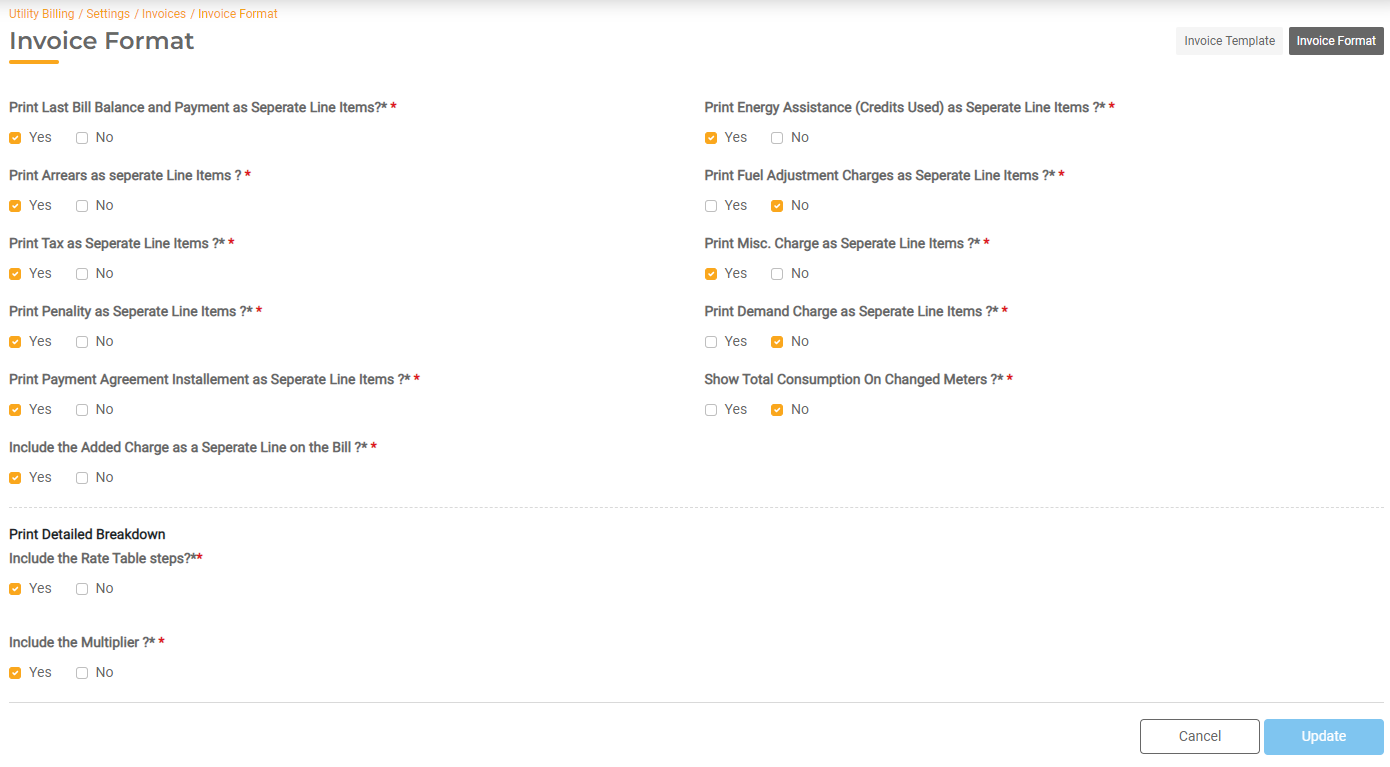
You can determine whether the invoices will have the various components printed separately on the bill or be included within a general "Miscellaneous" line item. To view and configure these settings, go to Utility Billing > Settings > Invoices and select the Invoice Format tab. These settings will be reflected on all bills, regardless of the Bill Template used.
- Print Last Bill Balance and Payment as separate line item?
- Print Arrears as separate line item? Note: Arrears will always be included if an unpaid balance due for the Utility Account. However, if this is set to yes, the Arrears will print in the Detail section of the bill alongside the other service charges. If this is set to no, the Arrears balance will be listed separately.
- Print Tax as separate line item? Note: if this is set to no, the tax will be included with x as opposed to being included as a separate line item in the detail.
- Print Penalty as separate line item?
- Print Payment Agreement Installments as separate line item?
- Include the Added Charge as a Separate Line Item on the Bill? If this is set to no, the bill will include the Added Charge with the other charges. If this is set to yes, the Added Charge will print below the service it's associated with.
- Print Energy Assistance (Credits used) as separate line item?
- Print Fuel Adjustment Charges as separate line item?
- Print Misc. Charge as separate line item? If this is set to no, the Misc. Charge will be combined with the Service Charge.
- Print Demand Charge as separate line item? If this is set to no, the Demand Charge will be combined with the Service Charge.
- Show Total Consumption on Changed Meters? If this is set to yes, it will calculate and display the total consumption added together for both meters if a meter changeout has occurred. If this is set to no, the bill would show a distinct line for each meter showing the consumption and charges.
- Include the Rate Table steps? If yes, this will apply only if you print services is different sections. This will only display on a full page bill as space is limited on a postcard bill.
- Include the Multiplier? If this is set to yes, the multiplier will display. This will only display on a full page bill as space is limited on a postcard bill.