FrontDesk & SimpleCity - Sync Procedures (Forte)
Overview of Changes
With the integration of SimpleCity’s Utility Billing desktop software and FrontDesk, you will see a few changes in SimpleCity and may need to change some of your procedures. This guide will review those changes.
The following processes will change
- AutoPay/ACH
- Setting Up Customers for AutoPay
- Taking Payments in FrontDesk
- E-Billing
- Preparing Your Deposit
- Updating Account Information
Migration Period
Once you have implemented the Utility Billing FrontDesk interface, you will enter into a migration period. You will use this migration period to transition any customers you have using Utility Billing ACH, E-Billing, or Utility Billing Internet. Typically the period is 2-3 months before those older Utility Billing modules are removed and all online payments and electronic billing occur through FrontDesk. Your Client Success Manager will discuss the migration period with you.
The migration period will allow your citizens (aka Public Users) time to sign up for a FrontDesk account in order to receive e-bills and sign up for AutoPay. During the migration period, the Agency will need to follow their normal procedures for Utility Billing ACH, E-Billing, and Utility Billing Internet, (if applicable) as well as follow the new procedures for FrontDesk. At the end of the migration period, all e-billing and AutoPay features will be performed in FrontDesk, and the Agency will no longer need to complete their ACH, E-Billing, or Utility Billing Internet procedures in the Utility Billing desktop software.
AutoPay/ACH
FrontDesk’s AutoPay feature is designed to replace SimpleCity’s Utility Billing ACH. FrontDesk allows citizens to sign up for AutoPay using either a credit or debit card or an e-check. Once the citizen has signed up for AutoPay in FrontDesk, their account will be paid automatically each month. The Agency can control how many days before the due date the payments are processed and specify banking blackout days, or days on which autopay will not run. AutoPay runs automatically and requires no processing from the Agency.
Setting up Current ACH Customers on FrontDesk
The Agency has the ability to sign up customers for AutoPay in FrontDesk. The Agency may choose to do this at the end of the migration period for any ACH customers who have not signed up for a FrontDesk Account. Customers who are on AutoPay but do not have a FrontDesk account will continue to receive a paper bill. To set a customer up for AutoPay, complete the following steps:
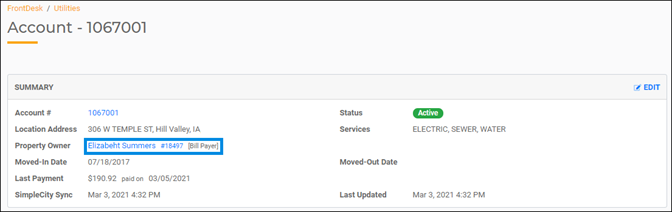
- Log into your gWorks Portal account at https://portal.gworks.com. Click on the FrontDesk Hub, then the Utilities tab. Search for the account. You can search by account number, name, or property location. Click on the ID to open the details of that account.

- FrontDesk will display the Public User associated with this account. This may be the property owner or the tenant. To the right, [Bill Payer] will be displayed if that Public User is responsible for the bill. Click on the Public User.
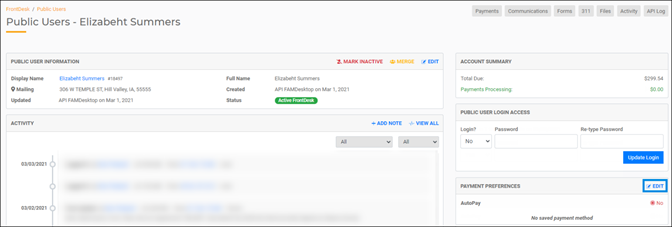
- Click on the Activate Public User button. Then click Confirm.

- In the PAYMENT PREFERENCES section, click on Edit.
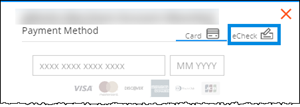
- Click on the Edit icon on the Add Payment Method button.
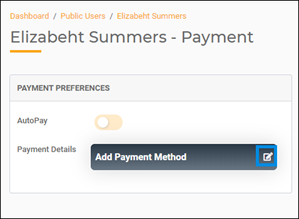
- Click on the eCheck payment method.
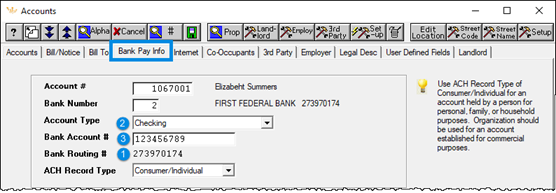
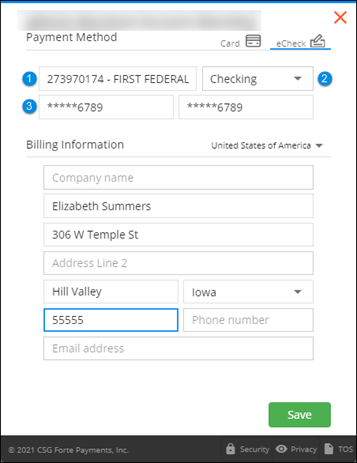
- In SimpleCity, open the account in Account Setup. Click on the Bank Pay Info tab. Using the information on the Bank Pay Info tab, fill out the routing number, account type, and account number in FrontDesk. Enter the customer’s name and address in FrontDesk, then click Save.
- Click the toggle to turn AutoPay on.
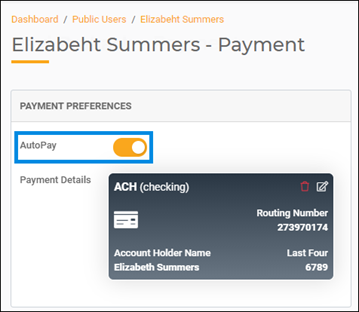
All payments for this account will now be made through FrontDesk and NOT through the SimpleCity Utility Billing desktop software.
Taking Payments via FrontDesk
The Agency may enter credit card or e-check payments into FrontDesk for both utility bills or forms. This can be helpful if a citizen wants to pay over the phone.
- Log into your gWorks Portal account at https://portal.gworks.com. Click on the FrontDesk Hub, then the Utilities Tab. Search for the account. You can search by account number, name, or property location. Click on the ID.

- FrontDesk will display the Public User associated with this account. This may be the property owner or the tenant. To the right, [Bill Payer] will be displayed if that Public User is responsible for the bill. Click on the Public User.

- Click on the Activate Public User button. Then click Confirm.

- Click on the Payments menu.

- FrontDesk will display any active invoices, including invoices for utility bills and forms. Click on the Pay Now button.
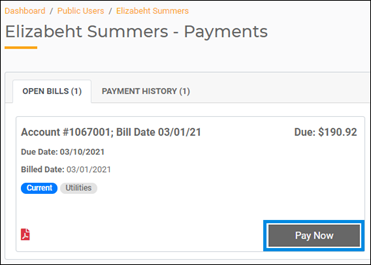
- Enter the payment information for either a credit card or an e-check (aka ACH) and the citizen’s name and address, then click Save.
Voiding FrontDesk Payments
If the Agency needs to void a payment received via FrontDesk, it must be voided in FrontDesk, and not SimpleCity. This will void the transaction with Forte, as well as the payment in FrontDesk and SimpleCity. You can only void payments the same day they are received. Once the payment has been sent to Forte, you will no longer be able to void it in FrontDesk. If a payment that needs to be voided is outside the void window, the agency will need to issue a refund via SimpleCity in Accounts Payable or Utility Billing.
Follow the instructions below to void FrontDesk payments:
- Log into your gWorks Portal account at https://portal.gworks.com. Click on the FrontDesk hub, then the Payments tab. Click on the Transactions subtab.
- You can scroll through the pending payments, or search for the transaction. Once you find the payment you wish to void, click on the Transaction Id.

- Click the Void button.

- The original payment and the reversal will sync to SimpleCity as two separate transactions but will cancel each other out. When settling your credit card payments in Bank Reconciliation Credit Card Deposits, you will need to include both the original payment and the reversal in the deposit.
E-Billing
When a citizen creates a FrontDesk account, they are automatically enrolled in E-Billing and will no longer receive paper bills. When you print your bills, the citizen will get an email letting them know their bill is ready. They will need to log in and navigate to the utilities tab in order to see their statement.
If the citizen wants to get a paper bill on top of an e-bill, they can do so by opting into that through the "my account" section in their FrontDesk profile. For instructions on that, follow the link here.
When running your first bill print post FrontDesk implementation, you will see an area for FrontDesk Bill format code.
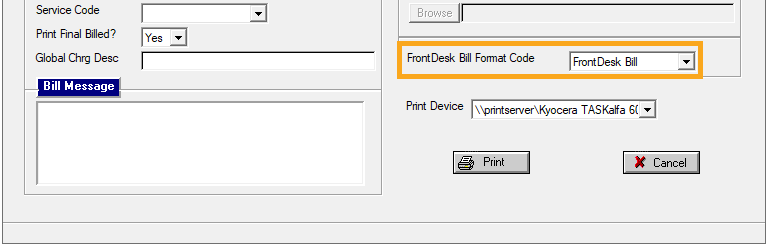
If you weren't previously utilizing e-bills, you will select "FrontDesk Bill" as the code. If your city was utilizing e-bills before FrontDesk, you would select "e-bills" or something similar for that code.
Preparing Your Deposit
With the implementation of FrontDesk, your procedures for preparing your deposit may change. FrontDesk allows citizens to make payments at any time. FrontDesk Payments are downloaded to SimpleCity through Receipt Management every 30 minutes while SimpleCity is running. Because citizens can make payments after business hours, you will need to prepare each day’s deposit the following day to include all after-hour payments.
Closing Out Your Drawer
The best practice is to count your drawer down to its standard amount at the end of each day. The following morning, prepare your deposit. This procedure allows you to include any payments from the dropbox in your deposit from the day before, as well as include all FrontDesk payments received after hours. This will make it easier to reconcile your credit card payments and ensure your Receipt Listing matches your Receipt Update Report.
To close down your drawer, use the following steps:
- At the end of the day, count your drawer down to its standard amount. Place the checks and cash in a cash box or safe.
- At the beginning of the next day, back up your data files using the RM-1 Backup ID before posting any payments in Receipt Management.
- Any FrontDesk payments will be automatically imported into SimpleCity. If you have Utility Billing Internet or phone payments, you may need to import an additional file.
- If you include payments received in the dropbox with the previous day’s payments, enter those into Receipt Management using the previous day’s date for both the Posting Date and the Update Date.
- Print the Receipt Listing using the previous day’s date. The total amount of cash and checks on the listing should match the total amount of checks and cash you are depositing at the bank. If it does not match, double-check that your checks have been entered correctly. It is not unusual for the deposit to be off by a small amount. Errors can be made when giving customers change. If the amount is less than $5 and you have doublechecked your checks, adjust the amount of the deposit. Forte will provide you with a spreadsheet each day that lists the payments included in each day’s deposit, as well as the type (either credit card or e-check.) Verify the total amount of FrontDesk Payments on your Receipt Listing matches what you have received from Forte Payments.
- Back up your data using the RM-2 Backup ID.
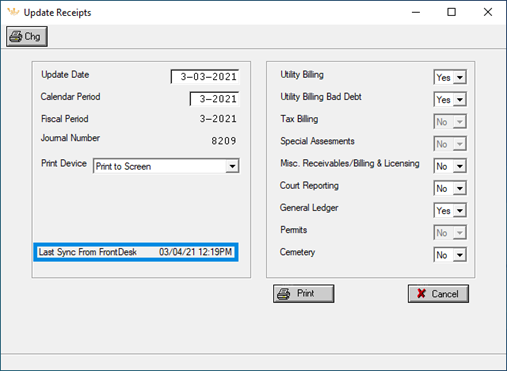
- Select Entry | Update Receipts. Update the receipts for the previous day. The total amount updated to General Ledger and the deposit(s) listed on the Update Receipts Journal should match your Receipt Listing.
- Fill out your deposit slip(s) and take the money to the bank.
FrontDesk and Credit Card Payments
FrontDesk accepts two types of payments, credit or debit cards and e-checks. When a citizen makes a payment, FrontDesk records it the day it was made. However, it will take two to three days before the funds are deposited into your bank account. SimpleCity tracks each pending credit card or e-check payment. Once the payments have been deposited, you will need to settle the payments included in each deposit. FrontDesk credit or debit card payments take two days to clear and e-checks take three days to clear. You will need to specify which pending payments are included in each deposit.
The following procedures describe how to settle the pending electronic payments.
- Verify the settlement information you received from Forte matches the deposits in your bank account.
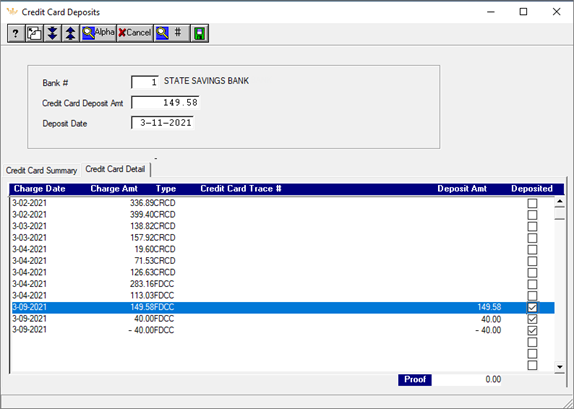
- In Bank Reconciliation, select Entry | Credit Card Deposits. Press F12 or click Next.
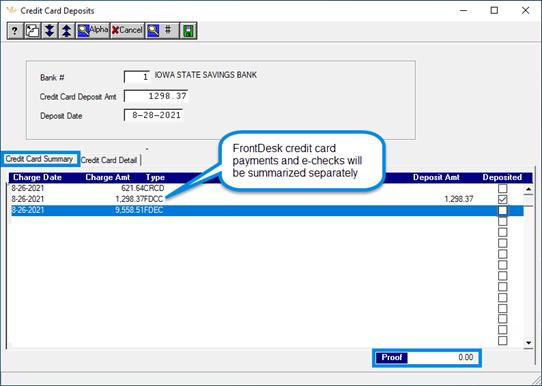
- Enter the Bank # of the bank in which the payments were deposited. Enter the Credit Card Deposit Amt and the Deposit Date. These should correspond to the settlement report you received from Forte.
- On the Credit Card Summary tab, SimpleCity will summarize all payments by type received each day. Select the Deposited checkbox of the summarized payments that were deposited. This amount should tie to the deposit and the Proof should be zero. Press F12 or click Save.
- If the summarized amount does not match the deposit, you may need to select the payments individually. On the Credit Card Detail tab, select the individual payments included in the deposit. Once you have selected all of the payments included in the deposit and the Proof is zero, press F12 or click Save.
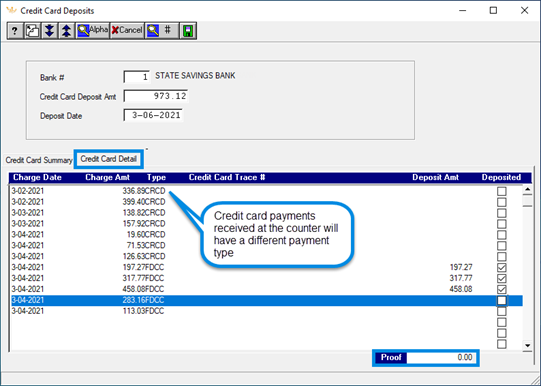
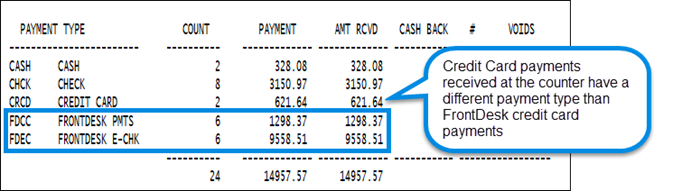
- You may have to repeat the steps for e-checks and credit card payments received at the counter.
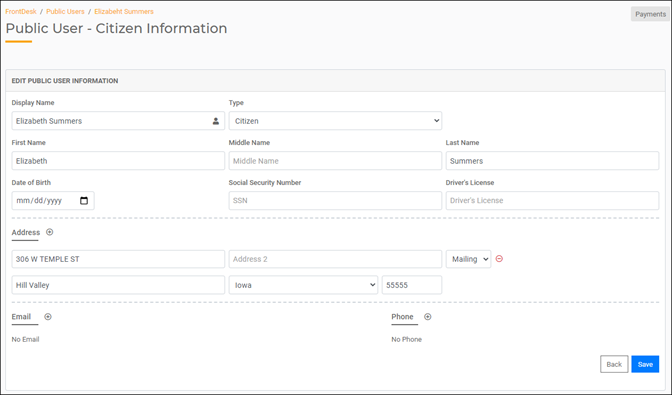
Updating Account Information
Once an account has been uploaded to FrontDesk, certain account information must be updated in FrontDesk. This ensures that the information in FrontDesk matches the information in SimpleCity. FrontDesk will update any changes made to SimpleCity during its sync. In Account Setup these fields will be greyed out.
You can update the following information in FrontDesk:
- Name
- Mailing Address
- Phone Numbers
- Social Security Number
- Driver’s License Number
- Date of Birth
- Email Address
- Log into your gWorks Portal account at https://portal.gworks.com. Click on the FrontDesk Hub, then the Utilities Tab. Search for the account. You can search by account number, name, or property location. Click on the ID.

- FrontDesk will display the Public User associated with this account. Click on the Public User.
- Click on Edit in the Public User Information section.
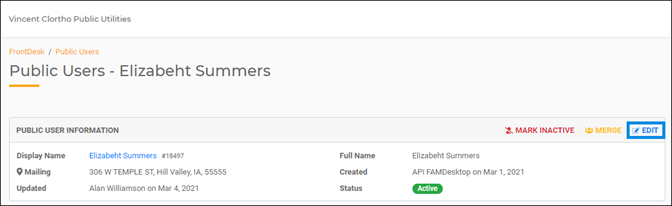
- Make the necessary changes, then click Save. FrontDesk will update the account information in SimpleCity the next time it syncs.
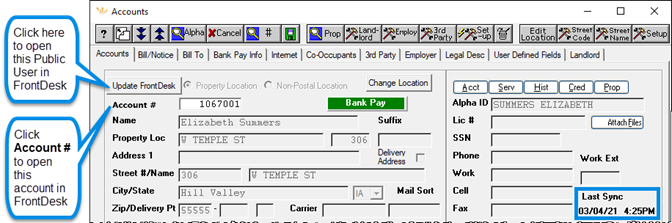
Account Setup Changes
A few new features have been added in Utility Billing Account Setup, as well:
- Update FrontDesk button – click this button to open the Public User account of the occupant in FrontDesk.
- Account # - click on Account # to open the utility account in FrontDesk
- Last Sync – SimpleCity displays the last time this account synced with FrontDesk.